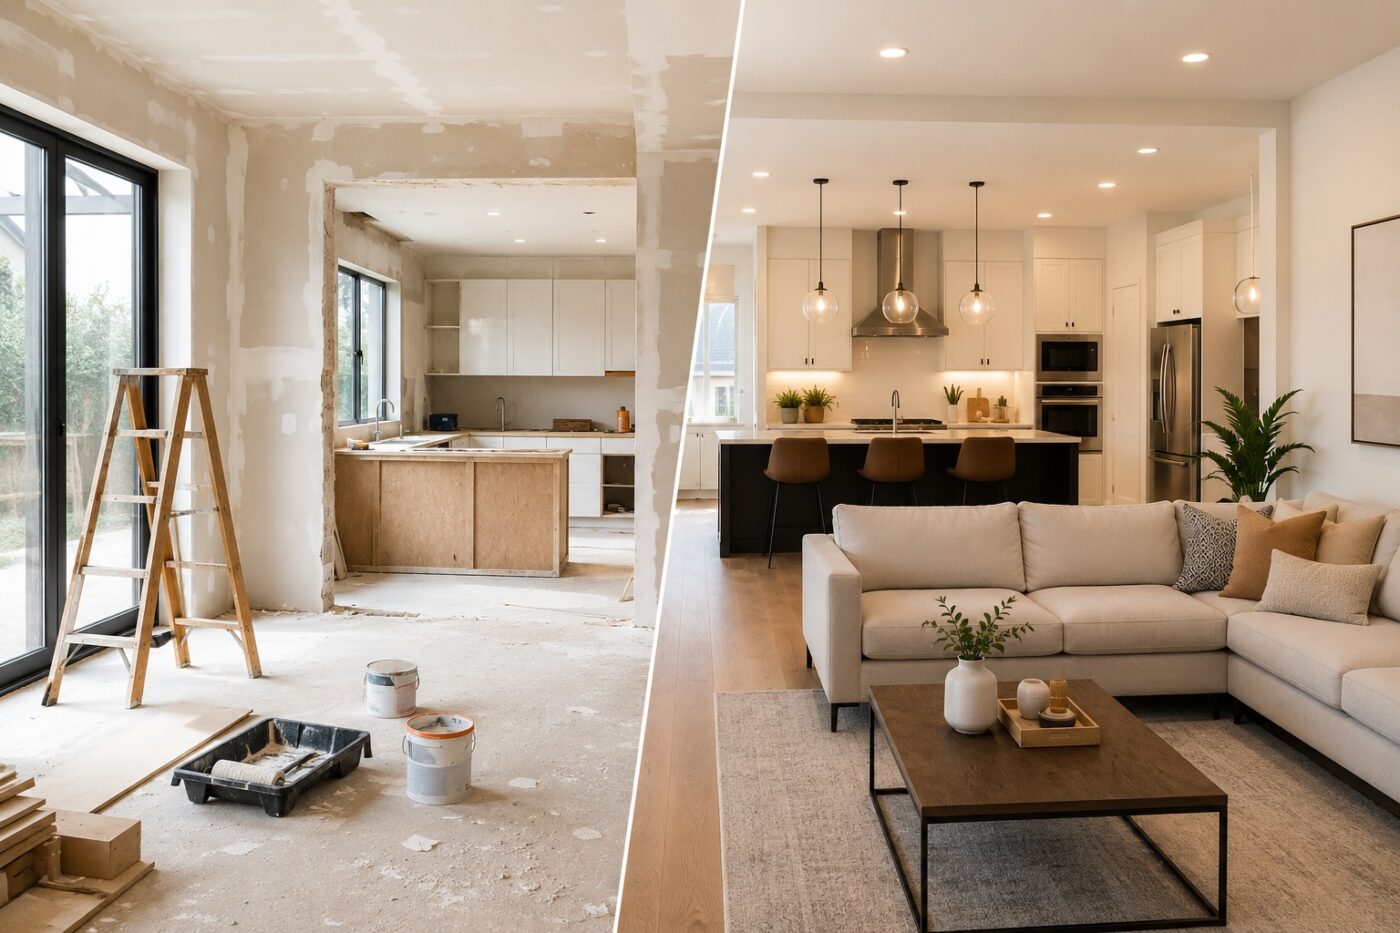
Planning a house renovation sounds exciting at the beginning. New interiors, modern materials, better comfort, and a fresh living space are easy to imagine. The difficult part usually starts after construction begins. Budgets increase faster than expected, materials arrive late, contractors overlap, dust spreads through the entire house, and simple decisions suddenly become stressful.
Many renovation problems happen long before the first wall is demolished. In most cases, the real issue is poor planning rather than poor construction work. Homeowners often start renovations without a clear budget, realistic timeline, material list, or understanding of the correct renovation order. As a result, projects become more expensive, more chaotic, and far more exhausting than originally expected.
A successful renovation is rarely about luck. It is usually the result of careful preparation, realistic expectations, and organized decision-making from the very beginning. Whether you are renovating a small apartment, updating an older home, or planning a full house transformation, following a structured renovation process can save significant time, money, and stress.
This guide explains how to plan a house renovation step by step, including budgeting, timelines, materials, contractors, renovation sequencing, and the most common mistakes homeowners regret later.
Table of Contents
Why Planning a House Renovation Matters
A renovation without a plan often becomes a chain reaction of expensive decisions. One delayed material delivery affects the flooring schedule, which delays kitchen installation, which pushes back painters, electricians, and final finishing work. What originally looked like a simple two-month renovation can quickly turn into a six-month project.
Careful renovation planning helps prevent this type of chaos.
When homeowners prepare properly before construction starts, they usually make better decisions about:
- renovation priorities;
- contractor scheduling;
- material selection;
- budget allocation;
- work sequencing;
- long-term functionality.
Planning also helps avoid one of the most common renovation mistakes — focusing too much on appearance before solving technical or structural issues. New flooring may look beautiful, but it becomes pointless if hidden plumbing leaks later destroy the finished surfaces underneath.
Another major advantage of renovation planning is financial control. Many homeowners underestimate how quickly renovation expenses accumulate. Small upgrades, rushed purchases, additional labor, and unexpected repairs can increase costs dramatically. A clear renovation strategy makes it easier to identify where money should actually be invested and where costs can safely be reduced.
There is also a psychological side to renovation planning that people rarely discuss. Living through a renovation can be mentally exhausting. Noise, dust, delays, and constant decision-making create stress very quickly, especially during long projects. Having a clear timeline and realistic expectations reduces uncertainty and makes the entire renovation process easier to manage emotionally.
Good planning does not guarantee a perfect renovation. Unexpected issues almost always appear at some stage. However, homeowners who prepare carefully are usually far better equipped to solve those problems without losing control of the project.
The Ultimate 12-Step House Renovation Guide
Step 1 — Define Your Renovation Goals
Before creating budgets, choosing materials, or hiring contractors, you need to understand exactly why you are renovating the house in the first place.
Some homeowners renovate to improve comfort and functionality. Others want to modernize outdated interiors, increase property value, improve energy efficiency, or prepare the home for a growing family. The purpose of the renovation affects nearly every future decision, including layout changes, material quality, contractor selection, and budget priorities.
This stage is also where many people make their first major mistake: trying to renovate everything at once without clear priorities.
In reality, not every room needs the same level of investment. Kitchens and bathrooms usually require the largest budgets because they involve plumbing, electrical systems, ventilation, waterproofing, furniture, and finishing work simultaneously. Bedrooms and decorative spaces are often much easier and cheaper to upgrade gradually over time.
It is also important to think about how the house functions in daily life rather than focusing only on aesthetics. A visually attractive renovation will still become frustrating if:
- storage space is insufficient;
- lighting is poorly positioned;
- the kitchen layout feels impractical;
- ventilation is weak;
- electrical outlets are missing in important areas.
Many homeowners only notice these problems after moving back into the renovated space.
Another important decision is whether you plan to stay in the house during construction. Small renovations are usually manageable while living on-site, but large-scale projects involving demolition, plumbing replacement, heating installation, or major structural work can become extremely difficult to live through comfortably.
This is also the best stage to collect inspiration. Saving reference photos, flooring samples, color palettes, or layout ideas helps create a clearer design direction before expensive construction work begins. Without a visual plan, many homeowners start changing design decisions halfway through the renovation, which often leads to delays and unnecessary costs.
The clearer your renovation goals are at the beginning, the easier every following step becomes.
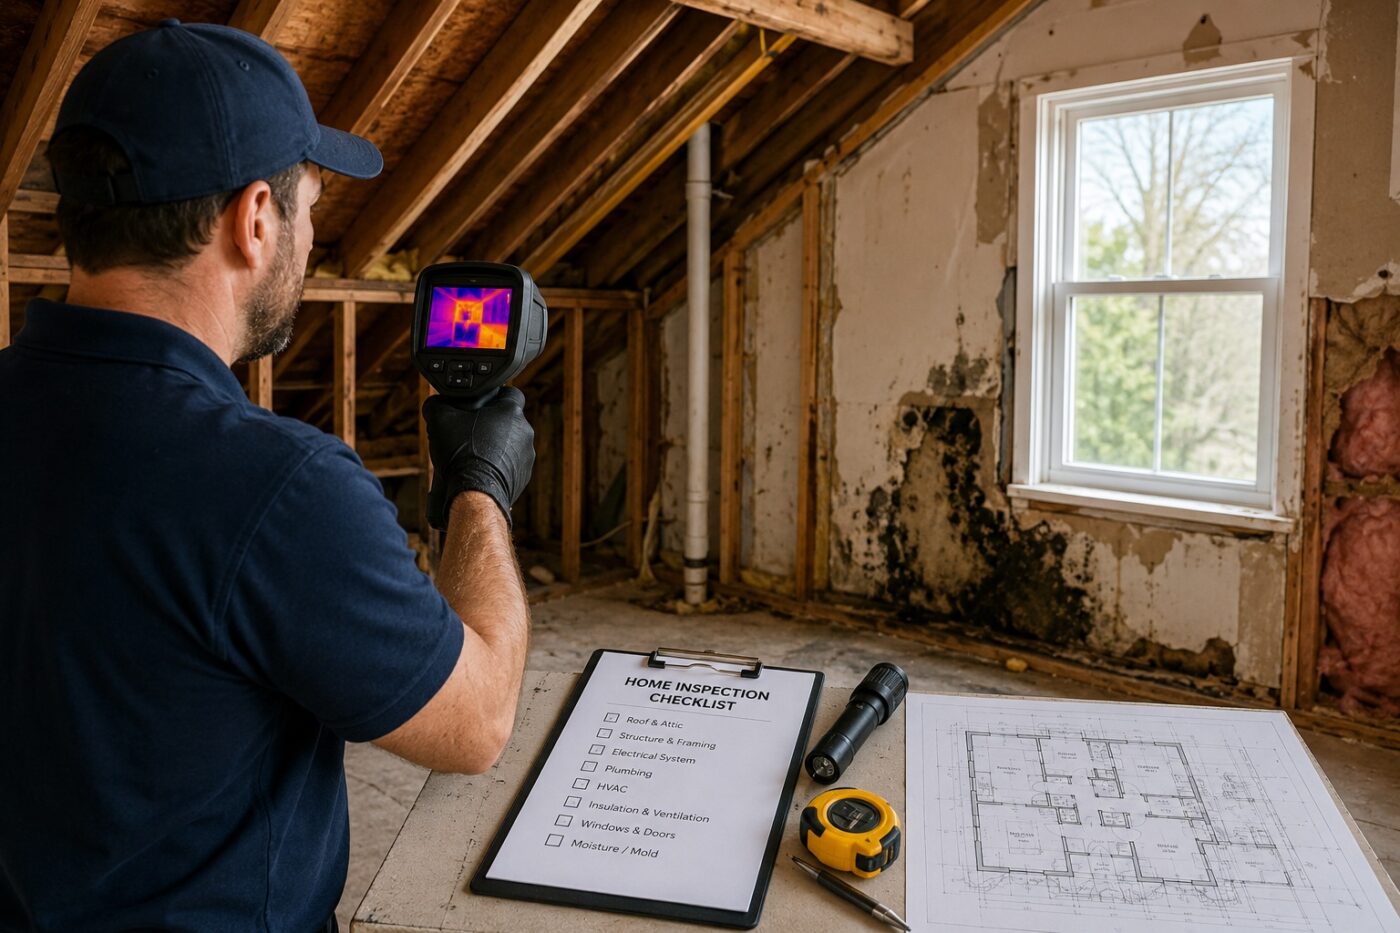
Step 2 — Inspect the Current Condition of the House
One of the biggest renovation budgeting mistakes is assuming that visible surfaces tell the full story about a house.
Fresh paint can hide moisture damage. Beautiful flooring can conceal weakened subfloors. A modern kitchen may still contain outdated plumbing or dangerous electrical wiring behind the walls.
This is why inspecting the real condition of the house before renovation begins is so important.
Start by examining walls, ceilings, floors, windows, roofing, plumbing systems, electrical systems, and ventilation. Look carefully for:
- cracks;
- moisture stains;
- mold;
- uneven floors;
- condensation;
- weak water pressure;
- outdated electrical panels;
- drafty windows;
- signs of poor insulation.
Older homes especially tend to reveal surprises once demolition starts.
Many homeowners discover hidden problems only after removing old flooring or opening walls. Common examples include:
- aluminum wiring;
- leaking pipes;
- rotten wood structures;
- mold behind insulation;
- improperly installed ventilation;
- damaged roof framing.
These issues can instantly change both the renovation timeline and budget.
This is also why professional inspections are often worth the cost, especially for older properties or full-house renovations. Structural engineers, electricians, plumbers, or thermal inspectors can identify expensive risks before construction begins rather than during the middle of the project.
A proper inspection creates a realistic starting point for the renovation. Without it, budgeting and scheduling become little more than guesswork.
Step 3 — Set a Realistic Renovation Budget
Almost every homeowner underestimates renovation costs at the beginning.
People usually calculate obvious expenses such as flooring, paint, or kitchen cabinets while forgetting:
- demolition waste removal;
- delivery fees;
- temporary accommodation;
- emergency repairs;
- tool rental;
- permit costs;
- material shortages;
- contractor delays.
This is where renovation budgets start losing control.
A realistic renovation budget should include both planned expenses and financial flexibility for unexpected problems. Most experienced contractors recommend keeping an emergency reserve of at least 10–20% of the total project cost.
For example:
- The baseline planned budget: For example, setting aside $40,000 for standard labor and materials.
- The recommended emergency reserve: Allocation of an additional 10% to 20% ($4,000–$8,000) strictly for unforeseen issues.
Without this safety margin, even relatively small surprises can create serious financial pressure.
It also helps to divide the budget into categories:
- structural repairs;
- plumbing;
- electrical work;
- insulation;
- flooring;
- bathrooms;
- kitchen renovation;
- labor;
- materials;
- contingency costs.
This approach immediately shows where most of the money is actually going.
One practical mistake many homeowners regret later is spending too much on decorative upgrades while cutting costs on hidden technical systems. Cheap lighting can easily be replaced later. Replacing poor-quality plumbing inside finished walls is much more expensive.
In most renovations, it is smarter to prioritize:
- roofing;
- insulation;
- electrical systems;
- plumbing;
- waterproofing;
- windows;
- heating systems.
These upgrades may not look impressive on social media photos, but they affect long-term comfort, safety, and energy efficiency far more than decorative finishes.
Another important reality is that renovation costs are rarely static. Material prices fluctuate constantly, contractor availability changes seasonally, and delivery delays can increase labor expenses. Tracking the budget throughout the renovation is just as important as creating it initially.
Homeowners who monitor expenses regularly usually spot problems early enough to make adjustments before overspending becomes serious.
Step 4 — Create a Renovation Priority List
One of the easiest ways to lose control of a renovation is trying to solve every problem at the same time.
A renovation priority list helps separate what is essential from what is optional.
This is especially important when budgets become tighter than expected, which happens in many renovation projects. Homeowners who already know their priorities make much calmer and smarter decisions when unexpected costs appear.
Structural and safety-related issues should almost always come first. These include:
- roof leaks;
- foundation cracks;
- plumbing failures;
- outdated electrical systems;
- mold problems;
- water damage;
- weakened floor structures.
Ignoring these problems while investing heavily in cosmetic upgrades often leads to expensive rework later.
After structural and technical systems are addressed, focus can shift toward:
- insulation;
- windows;
- heating efficiency;
- ventilation improvements;
- interior surface restoration.
Decorative upgrades should generally happen closer to the end of the project.
This does not mean aesthetics are unimportant. However, homeowners often regret spending large amounts on luxury finishes while basic systems inside the house remain outdated or unreliable.
It is also useful to divide renovation priorities into three categories:
Critical Repairs
Necessary for safety and long-term functionality.
Functional Improvements
Upgrades that improve comfort and daily usability.
Cosmetic Upgrades
Visual improvements that affect style and appearance.
This approach creates much more flexibility if renovation costs increase unexpectedly.
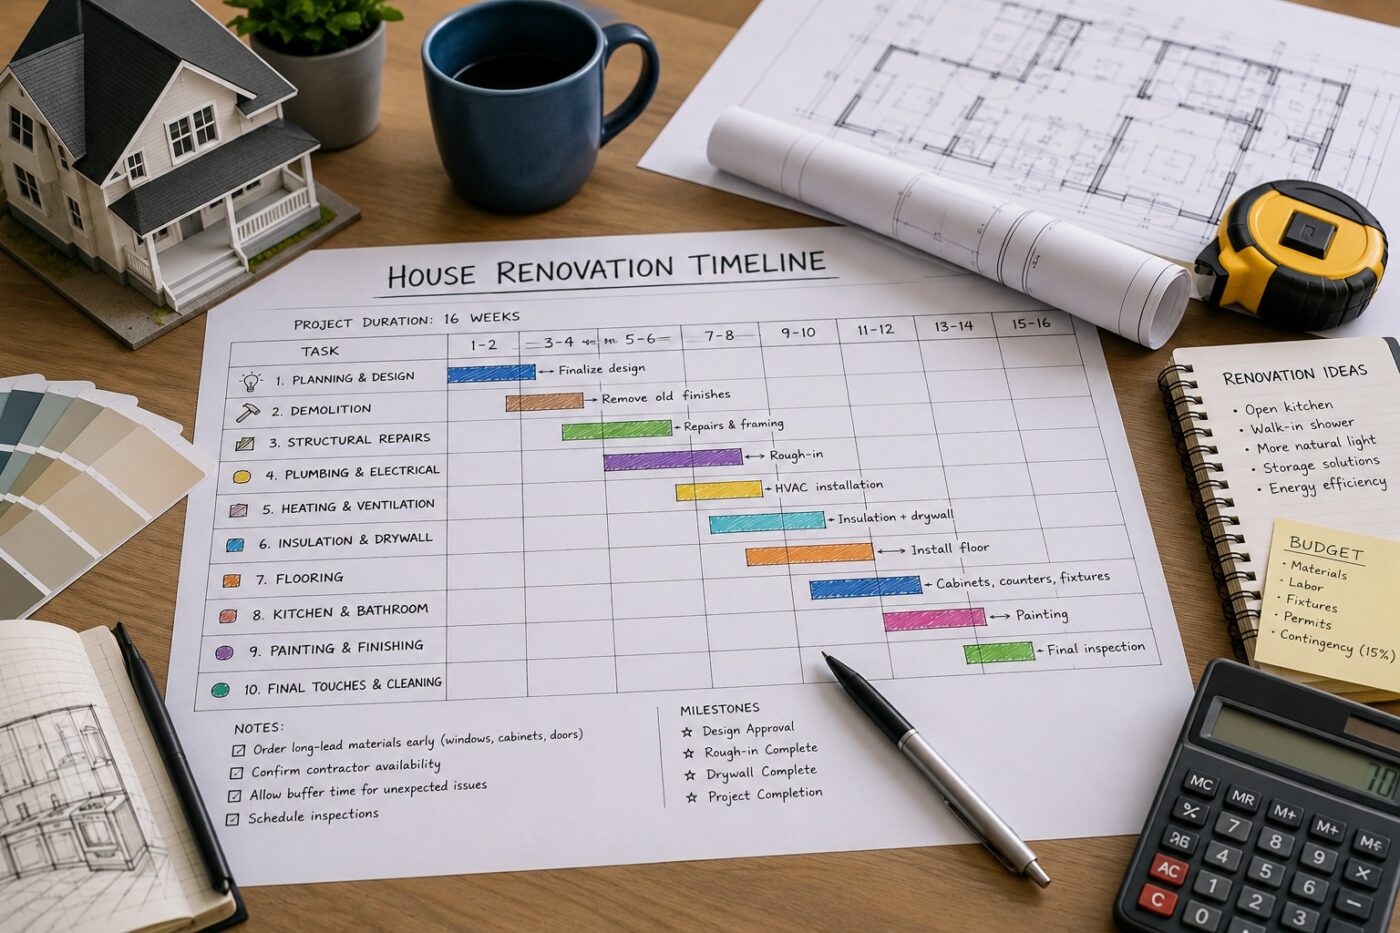
Step 5 — Make a Detailed Renovation Timeline
Most renovations take longer than homeowners expect.
Sometimes delays happen because of contractors. Sometimes materials arrive late. Sometimes unexpected structural problems completely change the schedule after demolition begins.
A realistic renovation timeline should account for all of these possibilities.
The best approach is dividing the renovation into separate stages:
- Planning and preparation.
- Demolition.
- Structural repairs.
- Plumbing and electrical work.
- Heating and ventilation.
- Wall and ceiling finishing.
- Flooring installation.
- Kitchen and bathroom installation.
- Painting and decorative work.
- Final cleaning and inspection.
Each stage depends on the previous one.
For example, flooring should never be installed before plumbing and electrical work are completed. Many homeowners learn this lesson the expensive way after contractors need to reopen finished floors to access hidden systems underneath.
Another important factor is material delivery timing.
Custom windows, doors, kitchen cabinets, specialty tiles, and furniture can sometimes require weeks or even months for delivery. Contractors arriving before materials are available often creates downtime, schedule conflicts, and additional labor expenses.
One practical renovation tip professionals frequently mention is simple:
Never create a renovation schedule with zero flexibility.
Unexpected delays are normal, not exceptional.
Adding buffer time between major renovation stages creates a far smoother and less stressful experience overall.
Step 6 — Choose Materials Before Work Begins
Late material decisions are one of the most common reasons renovations slow down.
Contractors may finish preparation work only to stop completely because:
- flooring has not been selected;
- tiles are unavailable;
- kitchen cabinets are delayed;
- paint colors are undecided;
- windows have not arrived yet.
This creates scheduling problems for every following stage.
Choosing materials before construction begins keeps the renovation organized and predictable.
It also prevents emotional decision-making under pressure. Many homeowners make poor material choices simply because contractors are already waiting and decisions suddenly feel urgent.
When selecting materials, price should not be the only factor. Cheap materials may reduce short-term expenses but create long-term problems involving:
- durability;
- moisture resistance;
- maintenance difficulty;
- poor insulation;
- faster wear.
Bathrooms, kitchens, entryways, and heavily used spaces especially require materials that can handle long-term daily use.
Another practical mistake people often regret later is failing to order extra material quantities. Tiles, flooring, wallpaper, and decorative finishes frequently require additional pieces because of:
- Cutting and fitting waste: Especially critical for tiles, wood flooring, and wallpaper patterns.
- Unexpected installation mistakes: Allowing extra material cover for accidental damage during the process.
- Future maintenance and repairs: Keeping a small batch of the same product line for years to come.
- Damaged product deliveries: Safeguarding the timeline against cracked tiles or warped planks upon arrival.
Ordering slightly more material from the beginning is usually far cheaper than trying to match discontinued products months later.
It is also important to think about how materials work together visually. A flooring sample that looks beautiful in a showroom may appear completely different under natural light inside the house.
Comparing samples together before purchasing helps create a more balanced and cohesive interior style overall.

Step 7 — Decide What You Can DIY and What Requires Professionals
DIY renovation can save significant money in some situations. Painting walls, assembling furniture, or performing simple demolition work is realistic for many homeowners.
However, one of the most expensive renovation mistakes is overestimating DIY abilities.
Online tutorials often make renovation work appear easier than it actually is. Real houses rarely behave like perfect demonstration projects. Uneven walls, hidden moisture, damaged structures, or outdated wiring quickly complicate even basic tasks.
Some work almost always belongs in professional hands:
- electrical systems;
- plumbing;
- gas connections;
- structural modifications;
- roofing;
- waterproofing.
Mistakes in these areas can create serious long-term problems involving:
- leaks;
- fire risks;
- mold growth;
- failed inspections;
- structural instability.
Many homeowners try to save money initially and later spend far more correcting poor installations.
The smartest approach is usually combining DIY work with professional services strategically. Cosmetic tasks such as:
- painting;
- cleanup;
- wallpaper removal;
- furniture assembly;
can often reduce labor costs without creating major risks.
Technical and structural systems should usually be handled by experienced professionals.
Step 8 — Get Permits and Check Local Regulations
Permit requirements vary significantly depending on location, but ignoring local regulations can create serious problems later.
Many homeowners assume permits are only necessary for large construction projects. In reality, approvals may also apply to:
- electrical upgrades;
- plumbing modifications;
- structural wall removal;
- roof replacement;
- heating system installation;
- extensions;
- window enlargement.
Unauthorized renovation work can affect:
- insurance coverage;
- property resale value;
- future inspections;
- legal liability.
Some homeowners only discover permit problems years later while trying to sell the property.
Another common issue involves homeowners associations or condominium regulations. Even relatively simple renovations may have restrictions regarding:
- noise levels;
- contractor access;
- waste disposal;
- exterior changes;
- working hours.
Checking regulations before construction begins is far easier than correcting legal issues after work is already completed.
Step 9 — Hire Contractors and Compare Quotes
Choosing contractors based only on the lowest price is one of the most common renovation mistakes homeowners regret later.
Cheap quotes sometimes hide:
- incomplete work scope;
- poor-quality materials;
- lack of experience;
- unrealistic timelines;
- hidden future costs.
Reliable contractors usually provide detailed estimates explaining:
- labor costs;
- materials;
- project stages;
- payment schedules;
- warranties;
- expected completion times.
Communication quality also matters more than many homeowners initially realize.
Contractors who respond clearly, explain problems honestly, and communicate regularly often create far smoother renovation experiences overall.
Another important lesson many homeowners learn too late:
never rely entirely on verbal agreements.
Written contracts help prevent misunderstandings involving:
- payment terms;
- project scope;
- timeline changes;
- material responsibilities;
- cleanup expectations.
Professionalism during the planning stage is often a strong indicator of how the contractor will behave once renovation work begins.
Step 10 — Prepare the House for Renovation
A renovation site becomes chaotic surprisingly quickly.
Dust spreads into unexpected areas. Tools and materials occupy large amounts of space. Noise becomes constant. Daily routines change almost immediately.
Preparing the house properly before construction starts helps reduce stress significantly.
Furniture, electronics, decorations, rugs, and valuables should ideally be removed from renovation areas completely. Construction dust can damage sensitive items much faster than most homeowners expect.
Floor protection is also important, especially when renovating only part of the house while still living inside it. Contractors moving heavy materials through finished areas can easily damage existing flooring or walls.
Waste removal planning is another detail many people underestimate. Renovation debris accumulates quickly, especially during demolition phases. Without organized disposal systems, construction areas become slower, less safe, and far more stressful to navigate.
For large-scale renovations, homeowners should also mentally prepare for temporary disruption. Even well-organized projects involve inconvenience, delays, noise, and uncertainty at some stage.
The smoother the preparation phase is, the easier the renovation process usually becomes overall.
Step 11 — Follow the Correct Renovation Order
Renovation sequencing matters far more than many homeowners realize.
Even high-quality work can become damaged if completed in the wrong order.
The correct renovation sequence generally follows this structure:
- Planning and budgeting.
- Demolition.
- Structural repairs.
- Roofing and insulation.
- Plumbing and electrical systems.
- Heating and ventilation.
- Walls and ceilings.
- Flooring.
- Kitchen and bathroom installation.
- Painting and finishing work.
- Final cleaning and inspection.
Problems usually begin when homeowners try to skip ahead.
For example:
- installing flooring before plumbing;
- painting before electrical work;
- installing cabinets before wall repairs.
These shortcuts often create repeated labor and unnecessary repair costs later.
Another common mistake is trying to overlap too many major renovation stages simultaneously. While some overlap is possible, excessive multitasking usually creates:
- contractor conflicts;
- damaged materials;
- scheduling confusion;
- slower overall progress.
Controlled sequencing almost always produces better long-term renovation results.
Step 12 — Track Progress and Control the Budget
A renovation budget should never be treated as a one-time calculation.
Expenses change constantly throughout construction.
Small upgrades, delivery fees, additional repairs, or design changes can slowly increase costs without homeowners fully noticing until the budget is already far beyond the original plan.
Tracking renovation progress regularly helps prevent this.
Useful things to monitor include:
- contractor progress;
- completed work stages;
- material deliveries;
- actual spending;
- remaining budget;
- project delays.
Many experienced homeowners recommend documenting the renovation process carefully using:
- invoices;
- receipts;
- contracts;
- warranties;
- progress photos;
- spreadsheets.
This organization becomes extremely useful later for:
- warranty claims;
- future repairs;
- insurance issues;
- resale documentation.
Another practical lesson:
avoid paying contractors fully upfront whenever possible.
Staged payments tied to completed milestones usually create better accountability and reduce unfinished work problems near the end of the project.
Regular quality inspections are also important throughout construction. Small mistakes are much easier to correct immediately than after multiple renovation stages have already been completed on top of them.
Common House Renovation Mistakes to Avoid
Even well-planned renovations can go wrong, but certain mistakes appear repeatedly in renovation projects.
One of the most common problems is starting construction before finalizing major decisions. Homeowners often begin demolition while still undecided about layouts, materials, or design direction. This usually creates delays and budget increases later.
Another major mistake is focusing too heavily on aesthetics while ignoring technical systems. Beautiful interiors become far less impressive when hidden plumbing leaks or electrical problems appear after the renovation is completed.
Material decisions also create many long-term regrets. Cheap flooring, poor waterproofing, weak insulation, or low-quality windows may reduce initial costs but often become expensive future problems.
Rushing the renovation process is another issue. Many construction materials require proper drying and curing time, including:
- plaster;
- tile adhesive;
- waterproofing systems;
- paint;
- concrete.
Trying to accelerate these stages frequently reduces long-term durability and work quality.
Homeowners also commonly underestimate the emotional side of renovations. Living inside construction zones for months while constantly making financial and design decisions becomes mentally exhausting much faster than expected.
Realistic expectations help enormously.
No renovation is completely stress-free. The goal is not perfection, but organization and damage control.
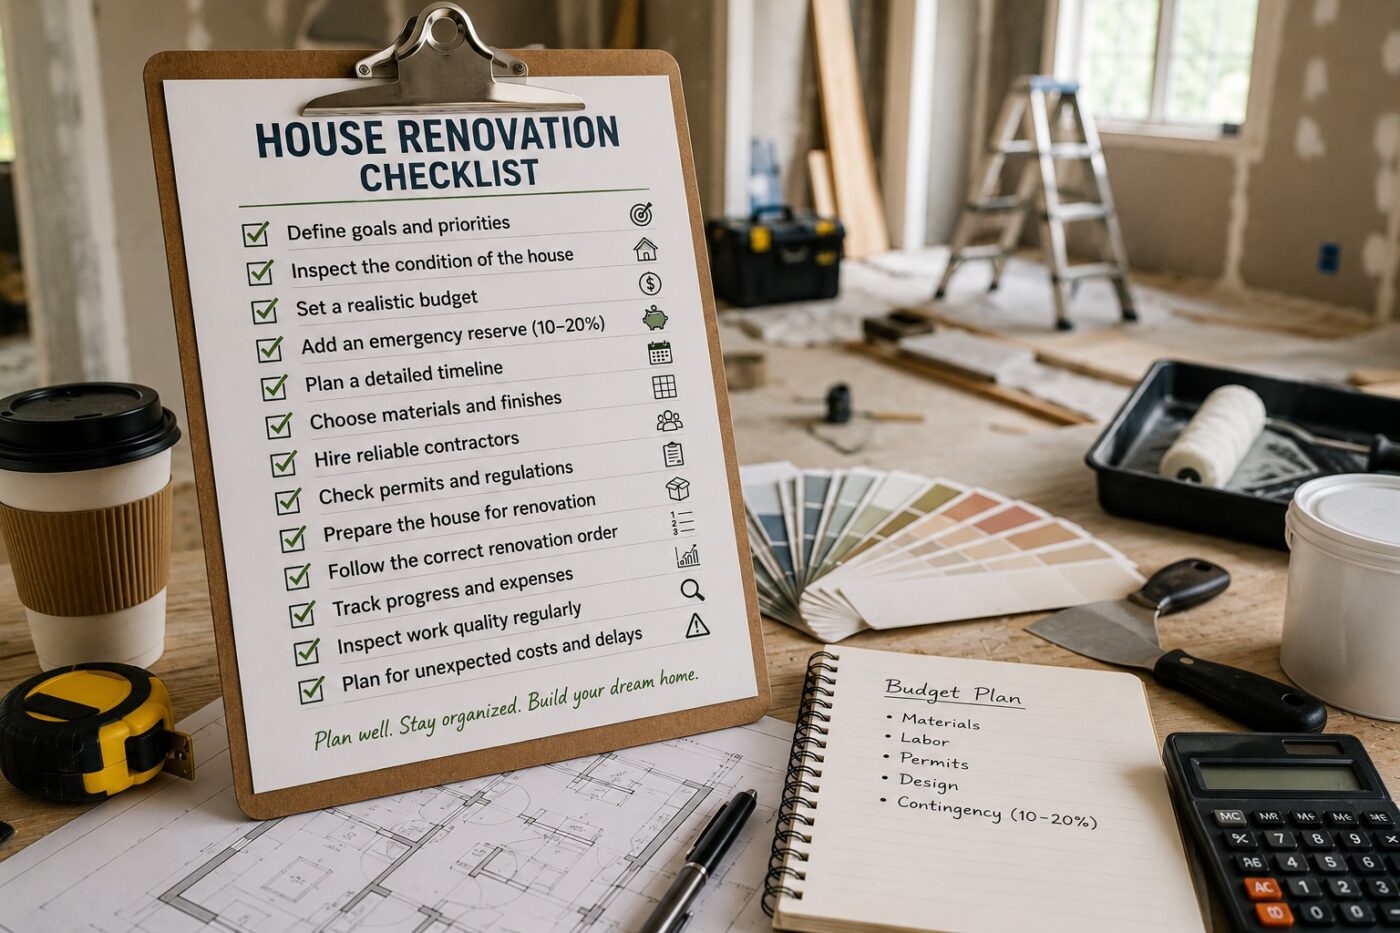
House Renovation Checklist
Before starting your renovation, make sure you have completed the following steps:
✔ Define renovation goals
✔ Inspect the condition of the house
✔ Create a realistic renovation budget
✔ Add an emergency reserve fund
✔ Prioritize structural and technical repairs
✔ Build a renovation timeline
✔ Select materials early
✔ Confirm material delivery schedules
✔ Decide between DIY and professional work
✔ Check permits and local regulations
✔ Compare contractor quotes carefully
✔ Sign written agreements
✔ Prepare the house for construction
✔ Follow the correct renovation order
✔ Track renovation expenses continuously
✔ Inspect work quality regularly
✔ Organize invoices and warranties
✔ Complete final cleaning and inspection
Final Thoughts
A successful house renovation is rarely the result of luck. It usually comes from careful planning, realistic budgeting, organized decision-making, and patience throughout the process.
Unexpected problems will almost always appear at some stage. Materials get delayed. Hidden damage gets discovered. Budgets change. Contractors reschedule. This is normal in renovation projects.
What matters most is how well prepared you are before those problems happen.
Homeowners who take time to plan properly usually make calmer decisions, avoid expensive mistakes, and maintain far better control over the renovation overall. The process may still feel stressful at times, but good preparation dramatically reduces the risk of complete chaos.
A renovation is also more than a visual upgrade. It affects comfort, energy efficiency, functionality, maintenance costs, and daily quality of life for many years afterward.
The best renovations are not always the most expensive ones. They are usually the projects where homeowners made smart long-term decisions, prioritized important systems correctly, and approached the renovation process step by step rather than trying to solve everything at once.