
INTRODUCTION
Renovating a home involves more than deciding what needs to be replaced or improved. The order in which work is carried out matters just as much. Installing new finishes before completing hidden plumbing or electrical work, for example, can mean opening up newly finished surfaces to make corrections. Understanding the home renovation order of work helps homeowners recognize these dependencies before they become costly problems.
A typical renovation workflow begins with assessing the property, confirming the scope of work, and preparing the site. Depending on the project, demolition and structural alterations may follow, before concealed building services are installed and checked. Walls and floors are then prepared for finishing, followed by surface treatments, fixtures, and final equipment installation. The process ends with inspections, testing, correcting outstanding defects, and handing over the completed work.
However, not every renovation follows an identical sequence. A cosmetic update, a room-by-room renovation, and a complete house refurbishment involve different tasks and dependencies. Building construction, materials, installation requirements, and local regulations can also affect when particular activities should take place.
This guide explains how renovation stages connect, which tasks must be completed before others, when work can overlap, and what homeowners should check before moving forward. Understanding these principles makes it easier to coordinate contractors, identify potential sequencing mistakes, and follow the project from its first preparations through final completion.
1. Understanding the Home Renovation Order of Work
A renovation workflow connects individual building tasks into a sequence that allows each stage to proceed without interfering with unfinished work. The important question is not simply which contractor arrives first, but what must be completed before another activity can begin. Choosing which improvements to prioritize is a related but distinct decision, covered in Renovation Priorities: What to Renovate First.
For example, the location of kitchen cabinets and appliances affects where plumbing connections, electrical outlets, and ventilation routes need to be installed. If these decisions are not coordinated before the relevant services are concealed, later changes may require reopening walls or altering completed installations.
Understanding these relationships helps homeowners assess whether a proposed work sequence makes sense, recognize when a stage is ready to proceed, and identify situations that require further checks before construction continues.
1.1. How Renovation Stages Depend on One Another
Renovation stages are connected through work dependencies: conditions or activities that must be completed before another task can begin safely or correctly.
These dependencies generally arise from three practical requirements.
Physical and structural readiness. Some activities need a completed structure or suitable working area. For example, changes to a load-bearing wall may affect the dimensions, support requirements, and installation routes of nearby building systems. The relevant structural work must therefore be assessed and coordinated before dependent installations proceed.
Access to concealed components. Certain installations become difficult to inspect or repair once covered. Pipes, wiring, structural connections, and other hidden elements may require testing or inspection while they remain accessible. Closing the surrounding construction prematurely can make necessary corrections more disruptive.
Material and installation readiness. Completing one operation does not always mean the next can begin immediately. A newly prepared floor may require additional curing, drying, or moisture checks before a particular covering can be installed. The appropriate criteria depend on the materials, construction method, and manufacturer's instructions.
These dependencies form the foundation of the home renovation order of work. They explain why some operations need a specific sequence even when the overall renovation schedule remains flexible.
The following overview illustrates how the main phases of a comprehensive residential renovation typically connect.
| Renovation stage | Main purpose | Key condition for moving forward |
|---|---|---|
| Pre-construction readiness | Confirm building conditions, scope, and necessary approvals | Essential assessments and design decisions are complete; required permissions are in place before affected work starts |
| Site preparation | Protect retained areas and establish safe working conditions | Access, protection, utility arrangements, and activity-specific safety controls are ready |
| Demolition and structural work | Remove selected elements and complete necessary structural changes | Discoveries have been assessed; relevant structural work is safe and required checks are complete |
| Rough-in building services | Install concealed plumbing, electrical, heating, and ventilation components | Service routes are coordinated; required installation and pre-cover tests are completed |
| Pre-cover checks and enclosure | Verify concealed work and close the relevant construction | Applicable inspections are passed and required records obtained before concealment |
| Substrate preparation | Prepare walls, ceilings, and floors for subsequent treatments | Substrate condition, including required moisture measurements, meets the chosen system's criteria |
| Interior finishes | Complete applicable waterproofing, tiling, painting, and floor coverings | Required waterproofing checks, preparation, and product-specific installation conditions are satisfied |
| Final installations | Fit fixtures, cabinets, equipment, and remaining service components | Supports, connections, clearances, and finishes accommodate the selected products |
| Testing and handover | Verify completed work, address defects, and transfer documentation | Specialist testing, required approvals, defect arrangements, and relevant records are confirmed |
This overview is a workflow guide, not a mandatory schedule for every renovation. A cosmetic refurbishment may involve little or no demolition, structural alteration, or concealed service installation. A comprehensive renovation of an older house may require additional assessments, repairs, and intermediate inspections.
Some phases also overlap. Structural work might continue in one area while independent service installations proceed elsewhere, provided the activities are compatible and the necessary safety conditions are maintained. A project does not need every room to reach the same stage simultaneously, but work in one area should not undermine the readiness of another.
1.2. Fixed Requirements vs Flexible Work Sequences
Not every part of the renovation sequence has the same degree of flexibility. Homeowners should distinguish between technical requirements that determine when work can proceed and organizational choices that allow some activities to be rearranged.
A technical dependency exists when moving forward too early could compromise safety, conceal unfinished work, or conflict with the requirements of a building system.
For example, a shower waterproofing assembly must be completed according to its system requirements before the relevant surface is covered with tile. Where water testing is specified or required, it needs to take place before the waterproofing becomes concealed. Manufacturer guidance for the Schluter KERDI shower system illustrates this relationship, although the exact procedure and timing depend on the selected system and applicable regulations.
Similarly, particular flooring materials require suitable substrate conditions before installation. Even if the rest of the room is ready, the flooring operation may need to remain on hold until those conditions are satisfied.
Other decisions are more flexible. Painting, installing certain fixtures, and laying particular floor coverings can sometimes be arranged in different orders. The suitable approach depends on the products involved, how components are installed, whether completed surfaces can be protected, and whether later activities could damage or restrict earlier work.
A kitchen provides a useful example. The order of installing cabinets and flooring cannot be determined solely by the appearance of the finished room. Some floating flooring systems have restrictions concerning heavy fixed cabinetry, while other flooring constructions have different installation requirements. The product specifications therefore influence the work sequence.
Flexibility also depends on the project layout. In a room-by-room renovation, work can sometimes proceed independently in separate spaces. However, shared plumbing, electrical circuits, ventilation routes, or structural elements may create dependencies between rooms that initially appear unrelated.
A flexible schedule does not make technical requirements optional. Work can be reorganized around genuine dependencies, but those dependencies must still be respected.
1.3. Technical Checks and Hold Points Between Stages
A hold point is a defined moment in the workflow when a task should not proceed until specified conditions have been checked or confirmed. Hold points help distinguish work that is visibly complete from work that is actually ready for the next operation.
For example, a wall cavity may appear ready for plasterboard or drywall, but the installations inside it might still require testing, correction, or inspection. Closing the cavity without completing those requirements can turn an accessible installation into a concealed problem.
There are two important types of checks.
Technical checks establish whether the work satisfies the conditions needed for the next operation. Depending on the task, these may involve checking installation positions, confirming that required testing has been completed, reviewing the condition of a substrate, or verifying that the manufacturer's installation requirements have been met.
Regulatory inspections are formal checks required by the relevant authority or applicable approval process. Their timing and scope depend on the jurisdiction and type of construction work. A sensible technical checkpoint is not necessarily a legally mandatory inspection, while a mandatory inspection cannot simply be replaced with an informal visual review.
For example, the City of Toronto's building inspection guidance states that building elements requiring inspection must remain accessible. Elements covered before passing a required inspection may have to be uncovered. New Zealand's Ministry of Business, Innovation and Employment similarly identifies possible inspection stages before concrete placement, installation of internal linings, covering drainage systems, and concealing certain waterproofing assemblies. Requirements vary with the consent and location.
Before allowing the next stage to begin, homeowners can ask four practical questions:
- Is the preceding work complete? Confirm that work needed for the next operation has been finished, including corrections.
- Have necessary checks been completed? Identify pending professional tests, inspections, or approvals.
- Will the next operation conceal or restrict access? Identify components that would become difficult to inspect or repair.
- Are materials and working conditions suitable? Check the relevant criteria for the selected product and construction system.
These questions support communication and oversight. They do not replace professional testing, structural assessment, or legally required inspections. If a check reveals a problem, dependent work may need to stop while genuinely independent work elsewhere can sometimes continue safely.
With those dependencies established, the first practical task is ensuring that the building, working areas, and essential arrangements are ready for renovation work to begin.
2. Preparing the Site Before Renovation Work Begins
Before demolition or installation work begins, the property must be ready for the activities that will take place inside it. Site preparation involves more than clearing rooms and providing contractors with access. It establishes the working conditions, confirms important building information, and addresses potential obstacles that could interrupt the renovation sequence.
An unidentified service route might conflict with a planned opening, while an occupied room without adequate protection could become exposed to construction dust. The objective is to ensure that work can begin safely, necessary decisions have been made, and existing parts of the home are protected from avoidable damage.
2.1. Confirming Work Scope, Building Conditions, and Required Approvals
The first task is to establish exactly which parts of the property will be affected and what conditions must be satisfied before physical work begins.
The agreed scope should identify the areas scheduled for demolition, structural alteration, service replacement, and finishing. It should also distinguish between elements being removed, modified, and retained.
This matters because renovation takes place around existing construction. A wall scheduled for removal may contain pipes or electrical wiring. A floor that appears suitable for a new covering may conceal previous alterations or damage. An installation route shown on an old drawing may not match the actual building.
Available drawings, previous renovation records, and relevant inspection information should therefore be reviewed alongside the current condition of the property. Where important information is missing, appropriate investigations may be necessary before work affecting those elements proceeds. Existing buildings can contain conditions that are not apparent until construction is opened. Initial assessment should reduce foreseeable uncertainty, not pretend to eliminate it.
Particular attention should be given to conditions that could affect the first construction activities:
- Structural elements that may be disturbed or modified.
- Existing electrical, plumbing, gas, heating, and ventilation installations.
- Signs of water intrusion or deterioration in affected areas.
- Materials that may present hazards when disturbed.
- Access restrictions that could influence demolition or installation work.
The findings should be communicated to the relevant contractors before work begins. If an investigation identifies a concern outside the agreed scope, the appropriate specialists should assess its significance before dependent activities proceed.
Identifying hazardous materials before disturbance
Older buildings may contain materials that require specialist assessment before demolition, drilling, sanding, or removal. The UK's Health and Safety Executive guidance on asbestos during construction explains that contractors must consider asbestos risks before maintenance, refurbishment, or demolition work that could disturb asbestos-containing materials. Specialist refurbishment or demolition surveys may be relevant where hidden materials could be affected.
The scope of legal responsibilities must not be generalized: the UK's separate duty to manage asbestos primarily covers non-domestic premises and common parts of multi-occupancy residential buildings, not an owner-occupied private home as such. Other obligations concerning safe construction work can still apply. Homeowners in any country should use the requirements relevant to their property and contractors.
In the United States, the Environmental Protection Agency's Renovation, Repair and Painting Program establishes requirements for certain paid renovation activities that disturb painted surfaces in housing built before 1978, subject to specified exemptions. This is a US-specific rule, not an international building standard.
When potentially hazardous materials are suspected, appropriate professional assessment should precede their disturbance rather than relying on ordinary demolition precautions.
Confirming approvals and technical responsibilities
Before starting work, establish whether the intended changes require permits, building control inspections, professional designs, or other approvals under local regulations. Requirements can differ between cosmetic improvements, changes to building services, and alterations affecting structural elements.
Where approvals are necessary, relevant documentation and responsibilities should be settled before the affected activities begin. Contractors also need to know which inspections or professional confirmations will be required as work progresses. This does not mean every renovation needs formal permission; it means approval requirements should be checked for the actual project rather than assumed from another property or country.
A useful readiness question is: Could an unresolved assessment, approval, or design decision prevent the first planned construction activity from proceeding? If so, that dependency needs attention before the affected work begins.
2.2. Protecting Existing Areas and Organizing Safe Access
Once the affected areas are identified, the property should be prepared to accommodate workers, materials, equipment, and waste without unnecessarily damaging elements that will remain. Protection should match the work being undertaken. Light decorative improvements have different requirements from extensive demolition, concrete cutting, or removal of existing building services.
Protecting retained building elements
Flooring, doors, windows, stairs, fitted furniture, and other surfaces that will remain in place may need temporary protection. The method depends on the material and expected exposure. A finished timber floor, for instance, may require a different protective system from ceramic tile. Protection should not introduce trapped moisture, adhesive damage, or other harm to the underlying surface.
Where practical, fragile furnishings and valuable belongings should be moved away from the work area. Elements that cannot be removed need compatible protection. A room may be outside the renovation scope but still lie along the route used to move equipment, remove debris, or deliver heavy components. Entrances, stairways, corridors, and door openings are therefore part of the working environment.
Separating construction activities from occupied areas
Dust and airborne contaminants can travel beyond the room where work is taking place, particularly during demolition, drilling, sanding, or cutting. Physical barriers can help separate construction zones from unaffected areas. Depending on the activity, measures may include temporary partitions, protected openings, controlled access, and suitable dust-extraction equipment.
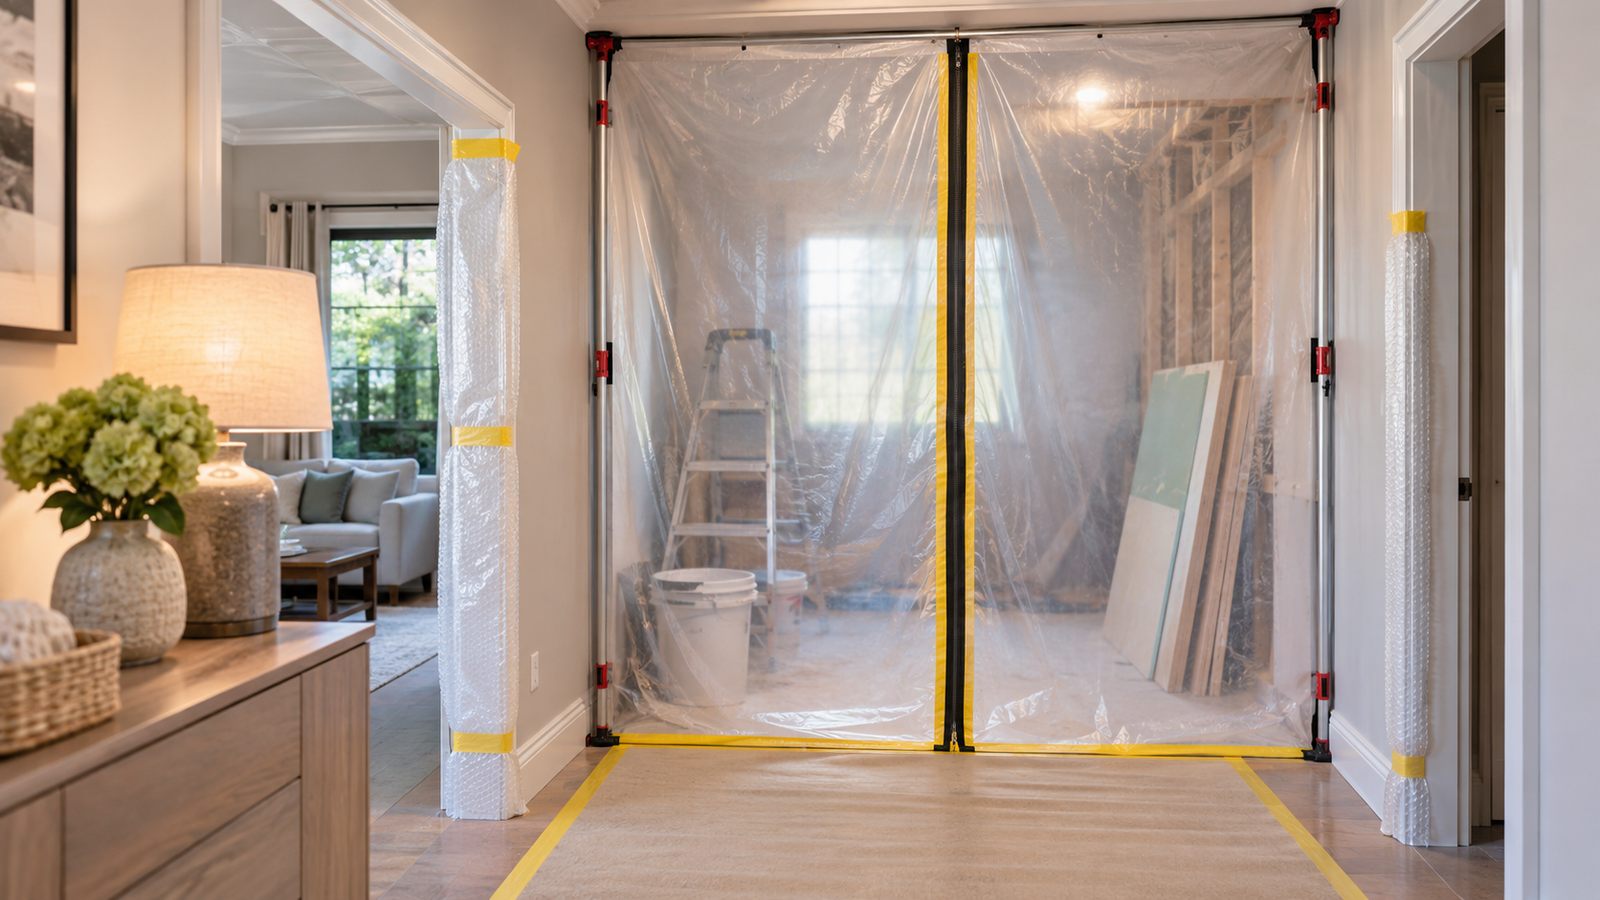
Some activities present more than an ordinary housekeeping problem. Cutting, grinding, or drilling concrete, bricks, mortar, or other silica-containing materials can generate respirable crystalline silica, a hazardous dust that may be too fine to see. The UK's Health and Safety Executive guidance on construction dust explains the exposure hazard. Appropriate professional dust controls and worker protection are needed; a basic room divider does not make high-exposure tasks safe.
The US Environmental Protection Agency's guidance on indoor air quality during remodeling explains how containing dust, isolating work areas when necessary, and managing ventilation can limit pollutant movement into occupied spaces. Ordinary dust barriers are not a substitute for specialist containment when hazardous substances such as asbestos or lead-based paint are involved.
Ventilation arrangements also require care. Powerful exhaust fans can create pressure differences that interfere with some fuel-burning appliances and their flues, potentially drawing combustion products into the home. Where this risk exists, competent assessment of the ventilation and combustion arrangements is necessary.
Maintaining safe movement and access
Before work begins, contractors and occupants should understand how people and materials will move through the property. Planning should account for safe entry and emergency escape routes, temporary storage and waste collection, heavy equipment, separation from hazardous activities, access to service shutoffs, and any restrictions associated with shared entrances.
For example, a hallway used to remove demolition waste should not become an unprotected storage area that blocks the home's only safe exit. In apartment buildings, arrangements may also depend on management rules, lift capacity, and shared services. If demolition or new installations change access, the arrangements need review before the next activity proceeds.
2.3. Planning Temporary Services and Occupied Spaces
Renovation activities can temporarily interrupt water, electricity, heating, ventilation, or access to essential rooms. These interruptions are especially important when residents intend to remain in the property. The necessary arrangements depend on which services are affected, how the home is occupied, and whether work can be separated into independent zones.
Identifying essential services and planned interruptions
Before construction starts, identify which existing services need to remain operational and which may require temporary isolation or disconnection. Replacing a main water distribution pipe could affect several rooms even if visible work is limited to one bathroom. Electrical modifications in one area may require an interruption affecting circuits elsewhere.
Responsible contractors should establish the extent of necessary interruptions, arrange safe isolation, and communicate conditions for restoring service. Electrical, gas, and other regulated systems must be handled by qualified persons where required. Homeowners should not create hazardous temporary connections to keep services operating.
For occupied properties, consider access to drinking water, sanitation, safe electricity, necessary heating or cooling, and suitable ventilation. A planned interruption may be manageable with safe alternatives. If essential facilities cannot be maintained, remaining in the property may not be practical.
Illustrative example: Renovating a bathroom while the home remains occupied
Consider a house with two bathrooms, one undergoing extensive renovation. It may appear possible to close the affected bathroom and use the other, but both could share a supply pipe or drainage section. Before work begins, the contractor needs to establish whether the remaining bathroom can operate safely during the planned activities. If a shared system must be disconnected, alternative arrangements or temporary accommodation may be necessary.
The same consideration applies to electrical circuits, ventilation ducts, and other shared systems. A room can be physically separate without being independent of the building services serving it.
Organizing renovation zones
For staged work, three practical areas can be distinguished:
- Active work zones: spaces where construction takes place and access is controlled.
- Protected occupied zones: rooms intended to remain usable subject to appropriate safety measures.
- Transition and service areas: routes and locations needed for movement, storage, or shared systems.
These are organizational categories, not formal regulatory classifications. Their boundaries may change as the project progresses. Special consideration is necessary for children, older occupants, pets, and people sensitive to dust, noise, pollutants, or access restrictions. Some activities may require an affected area, or the entire home, to be vacated until suitable conditions are restored.
Before the first construction activity, homeowner and contractors should share an understanding of work boundaries, essential service arrangements, and unresolved safety concerns. Any issue that prevents safe work should be addressed before the dependent activity begins.
3. Completing Demolition, Structural Work, and Weather Protection
Once the property is prepared, renovation can move into removing existing elements, making necessary structural changes, and addressing building defects that could interfere with later work. These activities often determine whether the original renovation plan can proceed as intended.
Not every project requires extensive demolition or structural alterations. A cosmetic renovation may involve removing old finishes and fixtures without changing the building itself. A comprehensive refurbishment may expose concealed construction, require modifications to load-bearing elements, or reveal problems that must be resolved before new installations proceed.
The aim is to establish a safe, stable, and sufficiently weather-protected building environment for the following work.
3.1. Selective Demolition and Discovering Hidden Conditions
Selective demolition involves removing specific building elements while preserving the parts of the property that will remain. Depending on the scope, this may include outdated partitions, wall and ceiling finishes, floor coverings, fitted furniture, or existing installations.
Unlike complete demolition, selective removal requires careful coordination with retained structures and services. The objective is not simply to clear a working area but to expose what needs modification without damaging components that are still required.
Demolition should follow the agreed scope rather than expand unnecessarily. Removing more material than planned can expose additional services, damage serviceable construction, and generate work outside the original project. Equally, preserving a defective element merely because it was not scheduled for replacement can interfere with later installations.
Before removing an element, responsible professionals should understand its likely structural function and relationship to existing services. Electrical cables, plumbing pipes, ventilation ducts, and other installations may pass through apparently removable construction. Where work could affect structural stability or hazardous materials, appropriately competent specialists must assess and manage it.
The UK's Health and Safety Executive guidance on demolition addresses structural stability, previous alterations, hazardous materials, and existing services. Associated legal requirements are UK-specific, but the risks arise in renovation projects elsewhere.
What demolition can reveal
Renovating an existing building means dealing with some concealed conditions that cannot be fully established beforehand. Removing finishes or opening a floor can reveal unrecorded alterations, water-damaged timber, unexpected pipes or cables, cracks, corrosion, or construction details different from the proposed design.
Not every discovery indicates a serious defect. Some differences can be accommodated through minor adjustments; others require professional investigation. The New Zealand Ministry of Business, Innovation and Employment explains that existing construction may remain unknown until work is underway and older drawings may not reflect previous alterations.
Illustrative example: Hidden damage behind an existing wall
Imagine an older house where the planned work includes removing internal wall finishes and replacing outdated services. During removal, workers discover deterioration in a timber element that may contribute to structural support.

Continuing with the planned installations would be premature because the element's condition and structural role are unknown. Work affecting it should stop while a qualified structural professional assesses the condition and determines whether repair or design changes are needed. Any necessary authorization for altered work must also be addressed. Unaffected activities may continue where safe and permitted.
Demolition is complete for workflow purposes when required elements are removed, retained construction is safe, and significant discoveries have been assessed rather than concealed. Later changes to design and trade sequencing are addressed in Section 8.
3.2. Structural Alterations and Building Stability
Structural renovation changes or repairs components that support a building and transfer loads through its construction. Depending on the project, this may include modifying a load-bearing wall, repairing a floor structure, strengthening an element, or creating a new opening. These operations differ fundamentally from removing decorative finishes or replacing non-structural fixtures.
A structural alteration can affect the building beyond its immediate location. Enlarging an opening in a supporting wall, for example, may alter how loads are transferred from construction above. The solution depends on the building's structural system, loads, existing materials, and proposed design.
An element's structural function cannot reliably be determined from its appearance alone. Wall thickness, material, location, and orientation may provide useful clues, but they are not sufficient to establish whether removal is safe. When structural changes are planned, a qualified professional should determine the necessary design and assess existing construction.
The Health and Safety Executive's guidance on structural stability emphasizes competent assessment before potentially load-bearing parts are altered and the need for correctly designed temporary support where stability could be affected. Regulatory responsibilities vary by country.
Temporary stability matters during construction
A building that will be stable once the renovation is complete may not remain stable at every intermediate stage. Removing an existing support before an approved replacement or temporary arrangement is in place can be dangerous. Structural sequencing must therefore account for stability during the work, not merely the finished design. Decisions about temporary support, load transfer, connections, and removal methods require structural expertise.
Coordinating structural work with later installations
Structural decisions establish dimensions, openings, fixing locations, and routes available to subsequent trades. Changes to a wall opening may alter nearby outlet, heating, or ventilation positions. Repairing a deteriorated floor structure can affect finished floor levels and the depth available for insulation or services.
Before dependent work proceeds, responsible professionals should confirm that the structural work corresponds to the appropriate design and authorized changes; required checks are complete; any temporary supports and access restrictions are understood; and the resulting construction is suitable for the next planned activity. Not every alteration requires the same inspections. Different renovation operations may overlap in separate areas only when structural stability and site safety are maintained. For a closer look at this particular phase, see EURENOVA's What Happens During Structural Renovation.
3.3. Resolving Water Intrusion and Establishing Weather Protection
Structural stability is not the only condition that determines whether interior renovation can proceed. The building must also be adequately protected against water intrusion that could damage materials or prevent later work from being completed correctly.
This matters when renovating older houses, repairing roofs, replacing external windows or doors, or modifying the building envelope—the roof, external walls, windows, doors, and associated layers separating the interior from outside conditions.
Defective roof coverings, flashing, external seals, and drainage details can allow water into renovation areas. If the source remains unresolved, newly installed insulation, linings, flooring, and decoration may become exposed to moisture.
Address the cause of moisture problems before concealing their consequences
A stain on an internal wall does not necessarily identify where water entered. Moisture may travel along framing, masonry, pipes, or other building components. Similar symptoms can result from condensation or plumbing leaks rather than rain penetration. The source needs investigation before the surface is simply covered with new material.
The US Environmental Protection Agency's guidance on mold and moisture explains that addressing the moisture problem is essential to effective mold control. Cleaning or covering damaged surfaces without correcting the cause is not a reliable remedy. Where damage is extensive, concealed, or associated with suspected mold contamination, professional assessment or remediation may be necessary.
Weather protection during an active renovation
Not every exterior element must be permanently complete before any interior work can begin. Nevertheless, the relevant work area must have sufficient protection for the activities and materials involved.
Replacing windows or modifying a roof may temporarily expose part of the building to the weather. Appropriately designed temporary coverings, staged installation, or changes to sequencing may be needed. Temporary protection must suit expected conditions and be professionally assessed where significant structural, wind, or access hazards exist. It does not automatically establish that all interior materials are ready for installation: existing moisture and environmental conditions still need checking.
Illustrative example: Roof repairs before interior finishing
Consider a house where the plan includes new ceiling finishes and insulation, but a roof defect admits rainwater into the roof space. Completing the ceiling first could conceal continuing moisture entry and expose the new materials to damage. A more appropriate sequence is to investigate and repair the source, assess affected construction, and confirm that the area is suitable for subsequent work. Independent activities may still proceed elsewhere in the house if conditions permit.
Before concealed service installation proceeds in an affected area, contractors should confirm that outstanding structural or water-related issues will not undermine the planned installation. Once relevant structures are suitable and the work zones adequately protected, the project can progress to coordinating building services.
4. Coordinating Rough-In Services and Pre-Cover Inspections
After the necessary structural work is completed and the relevant areas are ready, attention turns to the building services that will run through walls, floors, ceilings, and other concealed spaces.
Plumbing pipes, electrical cables, heating connections, ventilation ducts, and associated equipment may all need space within the same construction. A poorly positioned pipe can obstruct another installation; an overlooked ventilation route may require changes to framing or newly finished surfaces. The objective is to establish compatible routes, complete hidden installations, and verify them before access becomes restricted.
4.1. Sequencing Plumbing, Electrical, Heating, and Ventilation Rough-In Work
Rough-in work, also called first fix in some countries, generally refers to the initial installation of building services before relevant walls, ceilings, or floors are closed. It may include pipework, cable routes, electrical boxes, ventilation ducts, heating distribution components, and supporting elements required for later connections.
Many visible fixtures and final components will be fitted later. Rough-in completion does not necessarily mean that a system is ready for normal operation.
Plumbing and drainage rough-in
Plumbing work establishes locations and routes for water supply pipes, drainage connections, and other components before the surrounding construction limits access. These routes need to correspond with the planned positions of sanitary fixtures, kitchen appliances, and water-connected equipment.
Relocating a sink, for example, can change supply and drainage positions. If the location is altered after a wall has been closed, the construction may need to be reopened. Drainage systems also have design requirements: a route cannot be chosen solely because space is available. The responsible plumbing professional should confirm compatibility with the building layout, other services, and applicable requirements.
Electrical rough-in
Electrical rough-in establishes routes and positions for wiring, installation boxes, and related components before finishes are completed. The layout must account for lighting, switches, outlets, fixed equipment, and appliances.
In a kitchen, oven, refrigerator, extraction, and countertop appliance positions influence the needed electrical connections. If cabinet dimensions or equipment locations are not confirmed, early installation may produce misplaced connections.
Electrical routes also need coordination with the structure and other services. Required clearances, protective measures, and installation methods depend on applicable standards and construction conditions. Installation and testing should be completed by appropriately competent professionals, with certification or inspection arranged where required.
Heating and ventilation rough-in
Heating and ventilation systems introduce additional constraints because components may occupy substantial space or connect several parts of the building. The work can involve distribution pipes, underfloor heating circuits, ducts, extraction routes, equipment supports, and associated connections.
The arrangement should follow an appropriate system design. Ventilation ductwork, for example, may need routes that cannot easily be shared with smaller services. Underfloor heating circuits affect the floor assembly and the subsequent work needed to cover them.
For certain hydronic underfloor heating systems, the manufacturer requires a pressure test before pipes are concealed by screed. Uponor's solid-screed installation instructions are one example; the test procedure must follow the specific system and applicable standards rather than an assumed universal pressure or duration.
Is there a fixed order between plumbing, electrical, and ventilation work?
No single trade order applies to every residential renovation. The correct sequence depends on the service design, installation space, structural constraints, and access requirements. Larger ducts may need positioning before smaller cables or pipes because their routes are less flexible. Elsewhere, an existing structural opening or a necessary drainage connection may determine the first installation.
These are practical dependencies, not universal trade rankings. Agreeing on routes and resolving conflicts before installation is more reliable than assigning the same rigid order to every project.
4.2. Coordinating Service Routes and Trade Handoffs
Rough-in coordination becomes particularly important where several trades share walls, floors, ceiling voids, or service shafts. Each installer may understand their own system without knowing all the constraints affecting another.
An electrician may intend to use a partition section needed for a plumbing connection. A ventilation installer may need a ceiling void another contractor expects to fill. Identifying these conflicts only after installation can require removal, rerouting, or design changes.
Establishing a coordinated service layout
Before work proceeds, the relevant contractors should confirm major component locations, proposed routes, and connection points. Coordination should consider structural restrictions, available space, technical separation requirements, supports, maintenance access, and positions of the final equipment.
It must also anticipate later construction. Insulation, linings, floor assemblies, and finishes need to be installed without damaging or obstructing completed services. A route can fit physically yet still conflict with structural limitations, clearances, or access rules. Qualified specialists should evaluate the actual requirements, and substantial changes may need revised drawings or authorization.
Illustrative example: Coordinating services in a renovated kitchen
Consider a kitchen renovation with relocated cabinets, a new sink position, additional outlets, and a revised extraction route. The plumber needs established water and drainage connections; the electrician needs confirmed appliance and outlet positions; the ventilation installer needs a suitable extraction path.
If they work from different versions of the kitchen plan, the installations may not align with the finished cabinetry. A coordinated layout showing the cabinet dimensions, equipment positions, and connection requirements allows each contractor to identify conflicts while changes remain relatively accessible. This is why coordination is more than scheduling trades on consecutive days.

Handing work from one trade to another
A trade handoff occurs when one contractor's work establishes the conditions needed by another. It should communicate what has been completed, what remains outstanding, which restrictions apply, and whether the receiving trade can proceed.
| Work transition | Information or condition to confirm before the next activity |
|---|---|
| Structural contractor → service installers | Structural work and authorized routes are ready; restrictions and access are understood |
| Plumbing installer → adjacent trades | Pipe and connection positions are communicated, together with remaining testing requirements |
| Electrical installer → adjacent trades | Cable and equipment locations are coordinated; required protection and access are addressed |
| Heating or ventilation installer → other trades | Major routes, equipment locations, and conflicts are resolved |
| Rough-in installers → enclosure contractor | Required checks and records are complete; no unresolved issue will be concealed |
This is a coordination table, not a mandatory sequence in which each trade must finish all work. Several handoffs may take place within one phase, and contractors may return after another activity has been completed.
Documenting concealed installations
Before enclosure, updated drawings, photographs, installation information, and relevant test records can preserve the locations of concealed components. Photographs should contain enough context to be useful. They supplement, rather than replace, required tests and inspection records. They also do not make later drilling safe without appropriate checks.
4.3. Testing and Inspecting Hidden Installations Before Closing Them
The final rough-in checkpoint is to establish that installations have reached the required stage and undergone the checks needed before they become concealed. A wall lining, floor screed, or ceiling enclosure can make later correction difficult and disruptive.
Testing hidden building services
Different systems need different forms of verification. Plumbing rough-in may require pressure or leakage testing. Electrical installation requires the appropriate professional inspection and testing. Heating and ventilation systems have their own checks, some at this stage and others during final commissioning.
These activities are not interchangeable. For example, the City of Toronto's building inspection guidance includes applicable rough-in inspections before relevant construction is covered. The procedure applies within Toronto's framework and should not be presented as a universal inspection schedule.
Illustrative example: Underfloor heating before screed placement
Suppose a renovation includes water-based underfloor heating beneath a new screed. Once the pipes are covered, accessing a damaged section becomes harder. Where the system requires a pre-screed pressure test, the installer should complete and document it before placing the screed. Any defect needs correction and the specified follow-up verification before concealment. System instructions also govern the condition of the pipework during subsequent floor construction; there is no single universal testing pressure or duration.
Technical checks versus regulatory inspections
A technical check establishes the installation's suitability for the next operation. A regulatory inspection satisfies a formal requirement of an applicable permit or building-control process. Some projects need both; others use professional certification without the same authority inspection.
New Zealand's guidance on typical council inspections describes stages that may include pre-line and drainage inspections. The inspection schedule depends on the approved work. A project should not conceal relevant components before obtaining a required inspection, whatever the corresponding local process is called.
A practical pre-cover handoff check
Before an enclosure contractor covers a service installation, the project team should establish that:
- Installation: Work needing access is complete to the specified stage.
- Coordination: Service positions match the agreed design and unresolved conflicts have been addressed.
- Testing: The required professional tests and installation checks have been completed.
- Inspection: Any mandatory inspection or approval has been obtained before concealment.
- Records: Required results and useful location information have been retained.
- Corrections: Failed checks and defects affecting the next operation have been resolved.
These questions support oversight; they do not authorize a homeowner to approve specialist work. If a test fails or an inspector identifies non-compliance, corrections and required repeat checks must precede enclosure of the affected installation. Independent work elsewhere may be possible if safe and permitted.
Once the concealed systems have met the applicable conditions, the relevant areas can move toward insulation, wall and ceiling linings, and floor preparation.
5. Closing Walls and Preparing Floors and Other Surfaces
Once concealed building services have passed their required checks, renovation can progress toward closing open construction and preparing surfaces for finishing. This stage transforms exposed walls, ceilings, and floor structures into backgrounds suitable for the materials that will cover them.
Work may include insulation, internal linings, plaster, floor screeds, and corrections to existing surfaces. These activities have different installation requirements and do not follow the same sequence in every building. A surface can appear finished without being ready for its next covering.
5.1. Insulation, Wall Linings, and Ceiling Closure
Closing walls and ceilings generally involves completing internal layers and installing surfaces that support later decoration or other finishes.
Construction methods differ. A timber-framed partition may use plasterboard or drywall attached to framing, while masonry may receive plaster, a lining assembly, or another suitable treatment. Compatibility depends on structure, moisture conditions, required performance, and materials.
Completing insulation and internal construction layers
Where insulation forms part of an assembly, it should be installed in the location and manner required by the design. It may provide thermal or acoustic performance or contribute to a specified fire-resistant assembly. Gaps, inappropriate compression, or incorrect positioning can undermine the intended result.
Other components can include air-control or vapour-control layers, fire-stopping details, and seals around penetrations. Not every wall or ceiling needs the same arrangement. Climate, existing construction, and intended use affect the design; placing an impermeable membrane or additional insulation in the wrong position can create moisture problems. Required details should be confirmed before they are concealed.
Preparing walls for enclosure
Before a lining is installed, the responsible contractor should confirm that framing or background is suitable, required supports are in place, and no outstanding work needs access to the cavity.
Heavy wall-mounted cabinets, washbasins, and other fixtures may require structural backing or a designed fixing system. If discovered after decoration, the support may require opening the wall again. Access panels for components needing future maintenance should also be established before enclosure.
Closing ceilings
Ceiling spaces can contain ventilation ducts, cables, insulation, and access points. The lining must accommodate the specified performance, including any fire, acoustic, or moisture requirements. A suspended system can offer different service-access options from a lining fixed directly to a structural element.
After plasterboard or other lining is installed, joints, fixings, corners, and transitions are finished according to system requirements. Manufacturer guidance such as British Gypsum's Gyproc QuickSand instructions explain that successive jointing coats must dry before further finishing and decoration for that specific product. The area is ready to progress when the assembly and surface satisfy the next material's installation criteria.
5.2. Sequencing Plastering, Screeds, and Other Wet Work
Residential renovations often use water-containing materials such as plaster, screed, mortar, and leveling compounds. These wet work operations introduce additional moisture and may need specific conditions for setting, curing, drying, and later installation.
Plastering and floor screeds do not have one universal installation order
Whether walls should be plastered before screeding depends on the chosen construction systems. The order may be affected by the wall-to-floor detail, bonded or floating screed arrangements, perimeter isolation, underfloor heating, protection of completed surfaces, and the condition of existing construction.
Completing substantial wall preparation before constructing a floor may reduce damage risk in one project. Another specified assembly may require particular floor details first. The correct sequence preserves the intended performance of both systems rather than following a trade-order slogan.
The difference between setting, curing, and drying
Setting is the process by which a material develops initial rigidity. Curing concerns the conditions and processes through which it develops intended properties; for cement-based materials, moisture and temperature can be important to hydration. Drying involves reducing or redistributing moisture within the material.
A screed may be sufficiently set for a specified activity while still too moist for a sensitive covering. Likewise, curing conditions may need to be maintained before the drying stage. There is no universal waiting time that establishes readiness for every screed, plaster, or floor finish.
How site conditions influence wet work
Temperature, humidity, ventilation, substrate characteristics, and material composition affect setting and drying. The British Gypsum technical guidance illustrates that different gypsum products have particular minimum-temperature requirements. Cold conditions may extend setting and drying times, but this does not establish one figure for all products.
Uncontrolled attempts to accelerate drying using unsuitable heating or ventilation can conflict with a product's specified conditions. Any temporary climate-control method must be compatible with the construction materials and safe for occupants.
Illustrative example: Wall plaster and a newly installed screed
Consider a room requiring wet wall plaster and a cement-based floor screed. Rather than assume one must always precede the other, the contractor should confirm how floor perimeter details interact with wall finishes, how later work will avoid damaging new surfaces, and whether introduced moisture can affect subsequent materials. The result may differ from a room using dry-lined walls and a prefabricated floor system.
5.3. Checking Substrate Moisture and Readiness for Finishing
A substrate is the underlying surface or element that receives another material. It may be a concrete slab, new screed, plastered wall, timber subfloor, or board system. The next finishing activity depends on that substrate meeting the chosen covering, adhesive, waterproofing, or coating system's requirements.
What makes a substrate ready?
Readiness can depend on moisture condition, surface integrity, flatness or level, cleanliness, material compatibility, and suitable temperature and humidity. These are assessment categories, not identical acceptance limits. A timber floor, ceramic tile system, and resilient sheet covering can require different preparations and testing methods.
Why moisture testing matters
A concrete or screeded surface can look dry while moisture remains within the construction. Depending on materials, excessive moisture can interfere with adhesives, flooring dimensions, or durability.
The National Wood Flooring Association's installation guidelines emphasize checking and documenting jobsite conditions and subfloor moisture before wood-floor installation, according to the relevant product requirements. Forbo Flooring Systems' technical information likewise identifies substrate moisture assessment for applicable resilient coverings. Neither source establishes one permissible result for every floor, substrate, or testing method.
Underfloor heating and screed readiness
For some hydronic systems, the screed must undergo a specified initial heating or conditioning procedure before a floor covering is installed. The Uponor solid-screed instructions distinguish the pressure test before screeding from the later procedure before laying the covering and refer to the applicable standard and screed manufacturer's instructions. This is not permission to apply a generic heat-up schedule to all screeds. The specified procedure does not replace any moisture tests required by the chosen flooring system.
Illustrative example: A screed that looks ready for flooring
Imagine a newly placed screed with a firm, apparently dry surface. The contractor is due to install a moisture-sensitive covering, but its instructions call for substrate moisture testing. If results exceed the selected system's acceptance limits, the response may involve appropriate additional drying, investigating an unusual moisture source, or assessing a compatible manufacturer-approved moisture-control method. Installing the covering without addressing the requirement could create avoidable problems.

Checking existing substrates
Old concrete may contain cracks, irregularities, or adhesive residue; existing plaster may have areas of weak adhesion. Whether these conditions are acceptable depends on the proposed installation. Some need cleaning or local repairs, while others require investigation or replacement. A defect suggesting structural movement or moisture intrusion should not simply be concealed.
Before a finishing trade begins, homeowners can ask which substrate criteria apply, what preparation has been completed, and whether the relevant measurements or checks have been documented. The homeowner need not perform specialist testing; the aim is to establish evidence of technical readiness.
Once walls, ceilings, and floors meet the relevant requirements, the renovation can progress to waterproofing, tiling, painting, and floor coverings.
6. Sequencing Waterproofing and Interior Finishes
With walls, ceilings, and floor substrates prepared, renovation can progress to protective and decorative finishes such as waterproofing, ceramic tile, paint, timber, laminate, and resilient coverings.
The order of individual finishing activities depends on the selected materials, the conditions their installation systems require, and the work still to take place nearby. A shower membrane may need verification before tile; painting and flooring may be arranged differently according to the covering and the risk to finished surfaces.
6.1. Waterproofing and Required Checks Before Tiling
Waterproofing is critical in certain areas exposed to water, particularly showers and other wet zones whose construction requires a dedicated waterproofing system. Its place in the workflow matters because waterproofing components are often concealed under tile or another finish. Once covered, identifying and repairing faults can require removing the surrounding materials.
Waterproofing must work as a complete system
A tiled shower is not protected solely by its visible ceramic or porcelain tiles. Water can penetrate joints, gaps, and vulnerable interfaces. Where a waterproofing assembly is required, the system may include sheet or liquid-applied membranes, compatible boards, sealing details, and drainage connections.
The components are not automatically interchangeable. Compatibility and installation sequence must follow the chosen system. Special attention is needed at wall-to-floor junctions, corners, pipe penetrations, drains, and transitions to adjacent surfaces. The substrate must also be suitable before waterproofing begins.
Testing before waterproofing becomes concealed
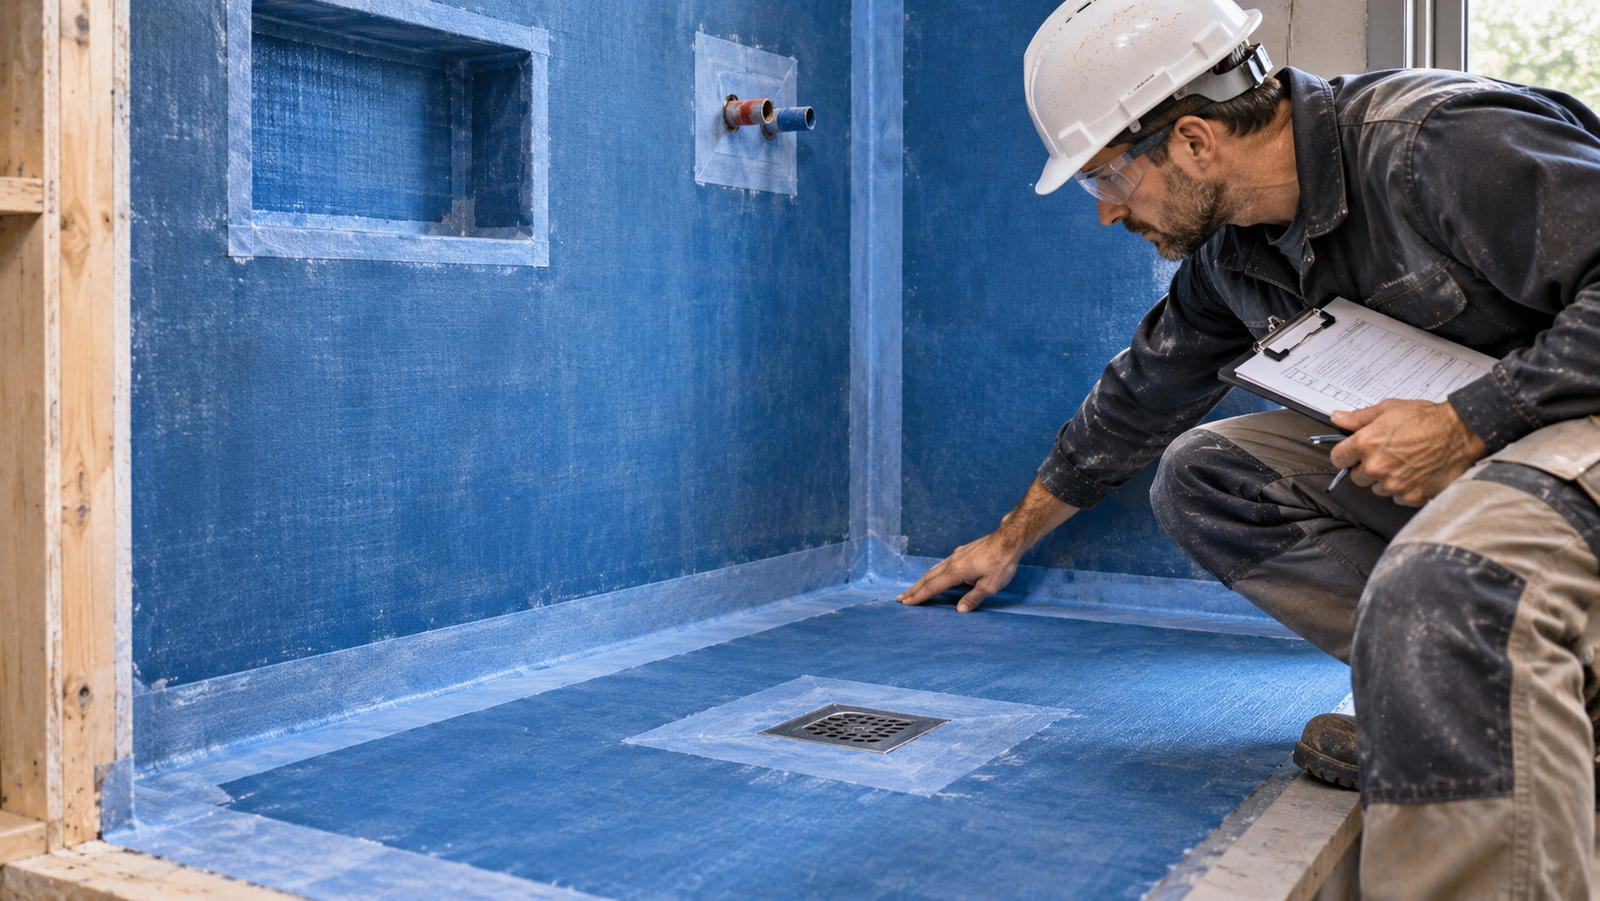
After installation, the applicable verification requirements should be completed before finishes restrict access. For example, Schluter Systems' shower testing guidance describes a pre-tile water test. For its specified KERDI assembly, Schluter recommends waiting at least 24 hours after membrane installation before starting the test under normal curing conditions. The procedure and timing are product-specific, and local codes may impose additional requirements. They are not universal rules for every membrane.
Illustrative example: Waterproofing a renovated shower
In a new tiled shower, the plumbing rough-in and substrate are ready. The installer completes the specified membrane, seams, corners, penetrations, and drain connection. Before tiling, any required or specified test and inspection must be completed. If a defect appears, it needs correction and appropriate repeat verification before the assembly is covered.
When tiling can proceed
Once the applicable checks are complete, tiling can begin when the membrane is ready for the specified adhesive and covering. The installer must follow the complete system's requirements for bonding materials, movements, seals, grouting, curing, and initial water exposure. The fact that the last tile has been placed does not automatically mean the shower is ready for use.
6.2. Ordering Tiling, Painting, and Floor Finishes
Tiling, painting, and floor installation do not always follow one universal order. What matters is whether an operation creates dust or moisture, needs heavy equipment, restricts access, or can damage work already completed.
Coordinating tiling with other finishes
Cutting tile, mixing bonding materials, and grouting can generate dust, moisture, and debris. In a bathroom with tiled shower walls, a tiled floor, and painted areas, the contractor should coordinate the tile layout, work access, junction details, and protection of adjacent materials. The order of wall and floor tiling may also vary with the system and method used to protect completed surfaces. Neither must universally come first.
Planning painting around flooring and other work
Painting is commonly arranged after substantial dust-producing work and surface preparation, but it also entails masking, equipment movement, and a risk of splashes. A common practical approach is to complete most ceiling and wall painting before sensitive floors are fitted, then undertake finishing touch-ups after later installation. Other arrangements are possible when materials and protection permit. Sherwin-Williams' painting FAQ describes ceilings before walls and trim afterward as a common room-painting order, while acknowledging that the sequence varies. That guidance does not determine when every type of flooring must be installed.
The suitable choice depends on what remains to be installed and any restrictions on the selected products. Painting is not always required to precede the floor, and a completed floor must not be exposed to incompatible coverings or loads merely to accommodate a preferred painting schedule.
Floor finishes depend on their construction and installation requirements
Bonded tile, wood, laminate, and resilient flooring have different installation systems. Some are adhered to a prepared substrate; others float and must accommodate movement. Wood flooring may be sensitive to ambient and substrate moisture; bonded coverings may have adhesive and substrate requirements. The National Wood Flooring Association provides jobsite and moisture guidance for relevant wood installations.
For the complete substrate-readiness decision, see Section 5.3. This section concerns the order and protection of visible finishes; the interaction between fixed cabinets and floating floors is addressed in Section 7.1.
Comparing two possible finishing sequences
| Approach | Potential advantage | Important consideration |
|---|---|---|
| Complete major painting before flooring | Reduces paint splashes and equipment damage to the new floor | Subsequent flooring work may require wall or trim touch-ups |
| Install flooring before final painting | Can simplify certain final edges and transitions | Requires compatible protection during painting and respect for floor curing conditions |
| Substantial painting → flooring → trim and touch-ups | Separates disruptive work from final detailing | Requires planned access, finish compatibility, and protection |
These are alternatives, not interchangeable prescriptions. The manufacturer of each selected system may restrict when it can be covered or subjected to later construction activities.
The practical decision is to establish which operation could damage another, which finish must remain accessible, and which product instructions determine the order.
6.3. Protecting Completed Finishes During Remaining Work
Completing a finish does not necessarily make a room ready for unrestricted use. Other contractors may still need access to install fixtures, connect equipment, finish trim, or make adjustments. Finished surfaces can be exposed to scratches, impacts, moisture, dust, and equipment movement. Protection belongs in the work sequence, not only in a response to damage.
Protecting new flooring
The protective method depends on the material, installation, adhesive, and curing requirements. Covering a newly bonded floor too early may interfere with curing; certain timber finishes may also need particular conditions. NWFA's wood flooring guidance emphasizes manufacturer instructions and avoidance of inappropriate moisture. Bona's professional flooring FAQ advises breathable protection rather than plastic or laminated sheets for its applicable newly finished wood surfaces, and cautions against covering too early. Those product-specific conditions reinforce why a plastic sheet is not automatically suitable for every new floor. Protection must not damage the surface or create unsafe walking conditions.
Avoiding damage to finished walls and ceilings
Large components moved through narrow openings may damage corners or paint. Drilling for fixtures may generate dust near completed finishes. Adhesives, sealants, or unsuitable tape can damage coatings. Suitable guards, compatible temporary coverings, protected access routes, and appropriate handling procedures can reduce these risks. Access needed for inspections must remain available.
Illustrative example: Finishing a room before remaining installations
Imagine a living room where flooring and painting are complete but interior doors, lighting fixtures, and fixed components remain to be installed. Workers still need to bring tools through the room and work on the walls and ceiling. Contractors should identify the traffic routes, choose floor and corner protection compatible with the new finishes, and communicate any curing restrictions. If an outstanding operation is particularly disruptive, completing it before a vulnerable finish may be more sensible than relying on protection alone.
Keeping the work area suitable for finishing
Housekeeping and access controls also matter. Debris beneath a temporary covering can scratch flooring; trapped moisture can cause damage rather than prevent it. Protection should be checked and maintained as work proceeds. Each incoming contractor should know which surfaces are finished and which precautions apply.
Once the required finishes are installed and adequately protected, attention turns to the fixtures, cabinets, equipment, and final service components. Their installation must still respect the performance requirements of the finished construction.
7. Installing Fixtures, Cabinets, and Final Building Services
Once relevant interior finishes are complete and installation areas are ready, renovation can move into fitting cabinets, sanitary fixtures, electrical devices, heating equipment, and other final components.
This stage brings earlier construction and rough-in installations together. Connections positioned behind walls or floors must align with the fixtures they serve. Finished surfaces must also accommodate fixings, access requirements, and remaining operations without unnecessary damage.
The order is not identical in every project. Some fixed components must precede particular floating flooring systems; others should follow surrounding finishes. The aim is to install each component in a way compatible with the selected products, then verify that the resulting systems operate as intended.
7.1. Coordinating Cabinets, Fixed Fixtures, and Flooring Systems
Cabinets, built-in furniture, sanitary fixtures, and other fixed components may be installed at different points in the finishing process. Their position depends on the construction beneath them, how they are supported, and the surrounding surfaces. A kitchen renovation illustrates the dependencies because it combines cabinets, appliances, plumbing, electricity, ventilation, and flooring in a relatively small area.
Confirming dimensions and installation requirements
Before installation, the actual finished dimensions should be checked against the selected products and agreed layout. Changes in plaster thickness, floor build-up, or structural geometry can affect available space. A tall kitchen cabinet designed for a particular ceiling clearance may not fit if the finished floor level differs from what was assumed. A concealed plumbing connection may also influence how a sink cabinet can be installed.
The installer should confirm that the finished dimensions suit the products, the supporting construction can carry the intended loads, fixing locations are suitable, services remain accessible where required, and installation will not obstruct necessary movement joints or other features of the floor and wall systems.
A plasterboard lining alone should not be assumed capable of supporting a heavy wall-mounted cabinet, washbasin, or other loaded component. The support and fixing method must suit the actual construction and manufacturer's instructions.
Should kitchen cabinets be installed before or after flooring?
The answer depends on the flooring system. Some coverings are installed as floating floors, meaning they are not permanently bonded or mechanically fixed to the substrate and must accommodate movement. Heavy fixed cabinetry placed on a floating floor may restrain that movement.
For example, the Pergo Original Laminate installation instructions state that kitchen islands and other very heavy objects should be installed first, not placed on top of the specified floating laminate. The flooring must be able to move around them with the required expansion gaps. This is a rule for that product system, not every flooring construction.
Ceramic tile, fully bonded flooring, engineered timber, and other assemblies have different installation methods and requirements. Their compatibility with fixed furniture should be assessed individually.
| Flooring arrangement | Main sequencing consideration |
|---|---|
| Floating laminate or another floating system | Confirm whether heavy fixed cabinets need to be supported independently of the floor |
| Bonded tile flooring | Coordinate cabinet locations, substrate preparation, movement joints, and installation details |
| Glued-down flooring | Check covering, adhesive, substrate, and subsequent-load requirements |
| Timber flooring | Consider movement allowances, moisture conditions, and the chosen method of installation |
Illustrative example: A kitchen island and floating laminate flooring
Imagine a kitchen renovation with floating laminate and a large, fixed island. The original schedule calls for the floor to be completed before the kitchen installer arrives. Reviewing the selected flooring instructions shows that the island must not restrain the floating installation.
The sequence therefore needs revision: the island must be supported on an appropriate construction, with the laminate fitted around it and the required movement gaps maintained. Plumbing or electrical connections serving the island also need coordination. Simply fixing the island through a completed floating floor could conflict with the product's installation requirements.

Installing fixed sanitary fixtures and built-in components
The same principles apply to washbasins, toilets, bathtubs, shower enclosures, shelving, and fitted furniture. A wall-mounted basin may need support and service connections established earlier. A shower enclosure may depend on completed waterproofing, finished surfaces, and compatible fixing details. Installing a fixture before its support or surrounding assembly is ready can interfere with finishing; installing it after inaccessible connections have been covered can require rework.
7.2. Completing Second-Fix Plumbing, Electrical, and HVAC Installations
Final installation of building services is often called second fix in British terminology, or finish installation or trim-out in other regions. It involves the visible devices and components connected to services positioned during rough-in work. The exact scope differs by system: some large equipment may have been mounted earlier because of construction or access constraints.
Final plumbing installations
Plumbing second-fix work may include taps, sinks, toilets, shower controls, and other sanitary fixtures. The installation depends on finished walls and floors, suitable mountings, and correctly positioned supply and drainage connections.
Where equipment is built into cabinetry, plumbing and cabinet installers should agree on the sequence. Some connections are easier before a unit is fully enclosed; others are designed to be made afterward. The responsible plumbing professional must verify the applicable aspects of the completed installation, including accessible connections and correct operation. A fixture's appearance alone does not demonstrate that its connections are sound.
Final electrical installations
Electrical second fix commonly includes switches, outlets, light fittings, controls, and equipment connections. These components must correspond with the intended electrical design and the earlier wiring. Finished walls and ceilings must provide suitable support; a heavy ceiling light, for example, may need structural backing rather than relying on a decorative lining.
Recessed fittings and other components must satisfy applicable requirements, including those concerning their location and surrounding materials. Qualified electrical professionals should complete the work and any required inspection, testing, or certification. The apparent simplicity of installing a visible device does not make regulated electrical work appropriate for an unqualified homeowner.
Final heating and ventilation installations
Depending on the design, the remaining work may include ventilation grilles, air terminals, control devices, heating accessories, and final equipment connections. Some systems have little visible second-fix work; others need substantial assembly and adjustment.
For example, a ventilation system's main ducts may be installed above a ceiling before it is closed, with grilles and controls fitted after decoration. Equipment requiring future inspection, cleaning, or servicing must retain appropriate access. Gas appliances, refrigerant circuits, and regulated electrical connections require the relevant qualified professionals and procedures.
Coordinating final installations without damaging finishes
The order should reflect the size, weight, and access needs of each component. A large built-in appliance may be difficult to position after adjacent cabinets restrict movement; delicate fixtures fitted too early risk damage from other trades. Contractors should identify which components need unobstructed access and which are better left until disruptive work is complete.
Installation must not compromise completed waterproofing, floor movement gaps, fire-rated assemblies, or other technical features. A visually neat fitting can still be incorrect if it interferes with those requirements.
7.3. Testing and Commissioning Installed Systems
Final installation and successful operation are not the same thing. A heating system may be connected but still need adjustment; a ventilation fan may run without supplying the intended airflow; a plumbing fixture may appear complete while a connection requires correction.
Commissioning involves verifying, adjusting, and recording that the installed system operates according to its intended design and applicable requirements. Its scope depends on the equipment. The US Department of Energy's HVAC commissioning guidance explains the purpose of verifying building-system operation against design criteria.
Why rough-in tests and final commissioning are different
Earlier checks establish particular conditions while concealed services remain accessible. Final testing addresses the completed installation, including fixtures, controls, connected equipment, and operating performance. A rough-in pipe test does not eliminate the need to check final plumbing connections; checking wiring before enclosure does not replace the relevant verification after devices are fitted.
Testing completed plumbing systems
The responsible professional should perform the checks suitable for the finished plumbing installation. These may involve examining accessible joints for leakage, checking fixture operation, and confirming relevant supply and drainage functions. Exact procedures depend on the system and local requirements. A newly installed tap, for example, must be evaluated in its completed configuration, not merely by reference to an earlier pipe test.
Verifying electrical installations
Final electrical verification may involve protective arrangements, installation inspections, applicable electrical measurements, and operation of connected devices. Requirements vary by country and electrical system. The fact that a light turns on does not establish that an installation meets electrical safety requirements. The responsible electrician should complete the necessary testing and documentation before normal use.
Commissioning heating, cooling, and ventilation
System-specific commissioning may cover equipment operation, control responses, airflow, circulation components, relevant safety functions, and manufacturer-required adjustments. For suitable ducted heating or cooling systems, ENERGY STAR's HVAC quality-installation guidance highlights matters such as airflow and duct-system assessment. Hydronic underfloor heating without ducts requires a different procedure; refrigerant-system checks apply only where such equipment is installed and should be performed by qualified specialists.
Illustrative example: A ventilation system that operates but performs poorly
Consider a renovated home with new mechanical ventilation. Main ducts were installed during rough-in, and terminals and controls were fitted after the finishes. The fan runs and air can be felt at outlets, but that observation does not prove that each area receives the intended flow. Where the design requires it, a commissioning professional should measure airflow, check controls, and make suitable adjustments. An unsatisfactory result requires correction and the applicable repeat verification.
Resolving issues identified during commissioning
A system should not be accepted as complete merely because its visible installation is finished. When testing reveals a problem, the responsible specialist should investigate, correct it, and repeat the necessary checks. Corrections need coordination with surrounding finishes where access is restricted.
Recording commissioning results
Required results, settings, certificates, and equipment-specific forms should be recorded for future operation and maintenance. Their transfer to the homeowner, together with any wider regulatory approvals and outstanding defects, is part of the final handover addressed in Section 9.
Once installed systems have been verified, remaining work can be coordinated around necessary corrections and finishing details. The sequence may still change to accommodate access restrictions, separate work areas, or unexpected conditions.
8. Adapting the Workflow to Real Renovation Conditions
A renovation rarely progresses exactly as originally scheduled. Work may need to be divided between occupied and unoccupied rooms, contractors may operate in separate areas, or an unexpected condition may require an adjustment. Existing properties contain structures and services whose condition may not be fully understood until work is underway.
The challenge is to distinguish between activities that can be reorganized and those that must follow specific safety, technical, or regulatory dependencies.
8.1. Whole-House Renovation vs Room-by-Room Work
The scope of work influences how renovation activities can be organized. A comprehensive refurbishment may involve coordinated work throughout a property, while a partial project may be undertaken in individual rooms or zones. Neither automatically creates a simpler sequence.
Whole-house renovation
In a comprehensive project involving shared services and numerous rooms, contractors may organize similar operations together. The plumbing contractor might complete rough-in work across bathrooms and the kitchen before the relevant cavities are closed. This can make shared routes easier to coordinate.
However, different rooms may become ready at different times. One bathroom may be ready for waterproofing while another requires a plumbing correction. A living room may be ready for painting while a separate space undergoes substrate preparation. Every room does not need to reach exactly the same stage together, provided its own prerequisites have been met.
Room-by-room renovation
A staged renovation may help retain usable living space and limit simultaneous disruption, but room boundaries are not necessarily service boundaries. Two bathrooms may share plumbing, circuits may span multiple rooms, and heating or ventilation equipment may serve the wider property.
Finishing a hallway before completing services for an adjacent room, for example, can create avoidable rework if those services must pass through the hallway. A staged plan therefore needs to coordinate shared elements even when the visible renovation remains local.
Comparing the two approaches
| Consideration | Whole-house renovation | Room-by-room renovation |
|---|---|---|
| Work organization | Several rooms may progress through related phases | Activities are organized around individual zones |
| Shared services | Can be coordinated as part of a broader plan | May require temporary connections or interruptions |
| Access | More areas may be available to contractors at once | Access routes may be shared with occupants |
| Finished surfaces | Larger areas may remain unfinished until later | Completed rooms need protection during subsequent work |
| Technical dependencies | Often extend across several systems | Can cross the boundaries of separate rooms |
| Main challenge | Coordinating trades and connected areas | Retaining usable spaces while handling shared work |
These are common organizational differences, not fixed rules.
Illustrative example: Renovating a bathroom and an adjacent hallway
Consider a bathroom renovation followed by new hallway flooring and paint. The bathroom plumbing needs access through part of the hallway floor. Installing the hallway floor first could require lifting it to reach the pipes. Completing or appropriately verifying the affected plumbing first protects the later finish, while unrelated hallway preparation might still be possible earlier.
8.2. When Different Renovation Tasks Can Run in Parallel
Parallel work can be useful when separate areas are ready and the activities do not interfere with each other. The decisive issue is not simply whether two contractors are available, but whether their operations are genuinely compatible.
Identifying genuinely independent tasks
Two activities are more likely to proceed together when neither relies on the unfinished result of the other, each has safe access, and their working conditions are compatible. Painting one room while another receives final light fittings may be possible if both have reached the necessary stage.
A practical coordination check considers four factors:
- Technical independence: no required prerequisite remains incomplete.
- Safe access: contractors and occupants can move without conflicting hazards.
- Compatible conditions: dust, moisture, vibration, or loads will not compromise nearby work.
- Shared services: both activities can proceed around planned isolations and system modifications.
This applies the general principle from Section 1 to actual work areas; it does not replace a specialist risk assessment or required approvals.
Activities that may conflict
Demolition may produce dust and vibration that interfere with painting. Wet work may introduce moisture into areas containing sensitive materials. Moving heavy equipment through a newly finished floor can damage it. Separation, scheduling, and compatible protection may help, but they cannot override curing restrictions or other technical requirements.
Illustrative example: Parallel work in two separate rooms
Imagine one bedroom undergoing wall preparation and painting while lighting fixtures are fitted in another room. If access and environmental conditions are independent, the activities may overlap. If the painting contractor must carry equipment through the room where delicate fixtures or finishes are being installed, access and protection need coordination. If safe separation is impractical, sequencing the tasks is preferable to forcing them to overlap.
Managing work that is temporarily on hold
A wall awaiting a required pre-cover inspection must stay accessible. That does not automatically prevent independent painting elsewhere. However, any wider restriction imposed by the regulator, designer, structural specialist, or responsible site professional must be respected. Homeowners should not independently narrow a safety-related hold point to preserve progress.
8.3. Responding to Hidden Defects and Changes During Construction
Unexpected discoveries can change the workflow after demolition or installation starts. The New Zealand Ministry of Business, Innovation and Employment explains that existing construction may not match available drawings and changes to consented plans may need an amendment.
This section concerns the effect of a change on the remaining work, rather than repeating the technical assessment of hidden damage described in Section 3.
Distinguishing minor adjustments from significant changes
Some differences can be accommodated through a modest, authorized installation adjustment. Others affect structure, water protection, regulated systems, or parts of the design on which other work depends. Examples include a concealed service route conflicting with planned equipment, moisture damage extending beyond the expected area, or construction unable to support a selected installation.
The responsible professionals should establish the significance of the discovery and decide which work must remain on hold. The homeowner's agreement to a change does not substitute for required technical design or regulatory approval.
Assessing the consequences before continuing
For a significant change, the affected specialists need to establish what has changed, whether further investigation is needed, and which subsequent activities depend on the decision. If rerouting a service requires disturbing a structural element, for example, structural assessment may also be necessary.
Illustrative example: An unexpected service route
During installation of a new ventilation duct above a suspended ceiling, the contractor discovers existing pipework occupying the proposed route. Moving the duct or changing the pipes might be possible, but neither solution should be chosen solely for convenience. The specialists must review available space, installation requirements, access, structural constraints, and the effects on the wider services. Agreed changes need to be communicated before affected installations proceed.
Checking whether changes require approval
A revision may affect approved plans, permits, calculations, or regulated work. The process depends on local law and the nature of the change. New Zealand's consent system, for example, distinguishes certain minor variations from amendments requiring formal approval. A change's small visible size does not necessarily make it exempt, and a contractor–homeowner agreement does not override approval requirements.
Updating dependent work after a change
After an appropriate solution is agreed, contractors should identify which drawings, routes, equipment positions, checks, and future handoffs need updating. Relocating plumbing may affect cabinet layouts or fixture positions. If later trades continue working from outdated information, one correction can create another conflict.
Maintaining progress without ignoring unresolved risks
A localized change need not stop genuinely independent work elsewhere. The affected work should remain on hold as long as necessary; other tasks may proceed only if they do not undermine investigations, temporary supports, access restrictions, or other safety arrangements. A useful revised workflow reflects the property's actual condition rather than preserving an obsolete schedule.
As the remaining work is completed, attention shifts from coordinating activities to confirming that the finished renovation meets the agreed requirements.
9. Inspecting Completed Work and Handing Over the Renovation
Installing the last fixtures and completing visible finishes does not automatically mean a renovation is ready for handover. The homeowner needs to establish whether agreed work is complete, defects have been identified, and relevant inspections and documentation are in place.
This stage connects the physical result with project acceptance and future use. A room may appear finished while a component remains incomplete, a required document is missing, or an approval has not been obtained. Construction completion and formal project acceptance are not always the same milestone.
9.1. Final Walkthrough and Identifying Outstanding Defects
A final walkthrough is an organized inspection of the completed areas, usually with the contractor or another responsible representative. It compares the work against the agreed scope, identifies visible defects or omissions, and records matters requiring follow-up.
Comparing the finished work with the agreed scope
Before the walkthrough, homeowners should review the contract, specifications, drawings, and approved changes. Work may have changed during construction; accepted variations should be reflected in the documents used to evaluate the result. Without a clear reference, a dispute may arise about whether an omitted item was included or whether the agreed standard was met.
The Consumer Affairs Victoria guidance on building progress recommends inspecting the property before possession and recording marks, damage, and outstanding matters on a handover sheet. Its legal framework is Victorian, but the documentation principle is useful more broadly.
What to examine during the walkthrough
The review should reflect the actual scope. Typical concerns include visible cracks or damage to walls and ceilings; damaged floor coverings and unfinished transitions; doors or windows that do not operate correctly; cabinet alignment and damaged fittings; incomplete bathroom and kitchen details; missing controls or fixtures; construction debris; and damage to areas that were intended to remain untouched.
A homeowner's visual and functional review is not a substitute for specialist testing. Turning on a light does not establish electrical compliance; running equipment does not prove that it has been properly commissioned. Where hidden defects or safety concerns are suspected, suitably qualified independent assessment may be appropriate.
Creating a practical defect list
Outstanding matters are often recorded in a punch list in North American English or a snagging list in British English. Each entry should identify the location, observed condition, agreed corrective action where established, and responsible party. Photographs can help document visible problems.
| Location | Observed issue | Required follow-up |
|---|---|---|
| Living room | Damage to newly installed flooring | Contractor to assess and agree on an appropriate correction |
| Kitchen | Cabinet door does not close correctly | Cabinet installer to inspect and adjust or repair |
| Bathroom | Specified accessory is missing | Confirm the outstanding installation responsibility |
| Hallway | Paint damage around a door frame | Finishing contractor to assess and correct |
| Utility room | Equipment documentation is missing | Obtain the relevant installation or operating records |
These are illustrative entries, not findings from a real renovation. The list should distinguish primarily decorative problems from possible concerns affecting safety, compliance, or essential use.
Distinguishing cosmetic defects from significant problems
A paint imperfection may require straightforward finishing work. Suspected leakage, unsafe electrical equipment, or a structural concern needs appropriate professional attention. The visible size of a symptom does not always establish its significance; if the cause is unclear, the relevant specialist should investigate.
9.2. Collecting Test Records, Approvals, and System Documentation
A renovation should be accompanied by relevant information demonstrating that applicable requirements have been addressed and supporting future operation and maintenance. The documentation varies with the work, the contract, the installed systems, and local regulations. A cosmetic refurbishment may require few technical records; extensive structural and services work may require considerably more.
Technical test and commissioning records
Where produced or required, collect electrical test and certification documents, plumbing and heating test records, ventilation commissioning information, manufacturer-specific forms, waterproofing verification, and relevant inspection reports. Not every item applies to every project.
The purpose at handover is to collect and interpret the status of records created earlier, not to repeat the rough-in or operational tests described in Sections 4 and 7. A certificate, test report, or drawing supports a particular aspect of the work; it should not be taken as proof that every unrelated contract detail is satisfactory.
Formal inspections and completion approvals
Where a renovation required permission or formal authorization, the relevant authority may require final inspection, certification, or another completion procedure. For example, New Zealand's Ministry of Business, Innovation and Employment describes Code Compliance Certificates for relevant consented building work. Other countries have different procedures and professional certification arrangements.
A regulatory approval does not necessarily confirm every decorative finish or contractual detail, and a satisfactory walkthrough cannot replace legally required inspection. Homeowners and contractors should establish which documents apply, who obtains them, and whether approvals remain outstanding.
Keeping accurate information about concealed installations
Drawings and photographs showing concealed pipes, cables, heating circuits, and other services can help future maintenance or alteration. Updated representations of completed work are often called as-built or record drawings. They are informative, but may be incomplete and do not replace safe detection, checks, or professional assessment before drilling or cutting existing construction.
Operating instructions and maintenance information
The handover package should include relevant manuals, warranty information, and maintenance instructions for installed equipment and finishes. Depending on the renovation, these may cover heating and cooling, ventilation filters, water heaters, controls, flooring care, cabinet hardware, and specialist inspections. Contractors should explain important controls and which servicing tasks require qualified personnel.
Organizing the renovation documentation
| Documentation group | Typical contents | Future purpose |
|---|---|---|
| Project records | Contract, agreed changes, relevant plans | Understanding the completed scope |
| Compliance records | Required approvals, certificates, inspection reports | Establishing applicable regulatory status |
| Technical system records | Test results, commissioning data, equipment settings | Supporting operation and troubleshooting |
| Installation records | Updated drawings, photographs of concealed services | Informing future maintenance and renovation |
| Product information | Manuals, warranties, maintenance instructions | Supporting proper use and upkeep |
| Completion records | Defect list, correction confirmations, handover sheet | Tracking outstanding obligations |
Digital copies improve access, but originals may need to be retained under applicable requirements. Missing required certificates or commissioning information should not be dismissed simply because equipment appears to run.
9.3. Resolving Open Items and Confirming Completion
After the walkthrough and documentation review, outstanding issues need to be assigned, corrected, and checked as appropriate. The process depends on the nature of the work, the contract, and local legal rules.
Agreeing on corrective actions
The homeowner and responsible contractor should review each defect, agree on the appropriate action where possible, and record any arrangements for follow-up. A damaged cabinet door may require adjustment, repair, or replacement. An omitted accessory may need installing. A suspected technical defect may require investigation before a corrective method is selected.
Cosmetic issues and problems affecting safety, compliance, or essential functions should not be treated as equivalent.
Illustrative example: A finished bathroom with two outstanding issues
Consider a renovated bathroom with a scratched cabinet panel and possible leakage beneath the washbasin. Both belong on the defect list, but they demand different responses. The panel can be assessed against the agreed finish standard. The suspected leak calls for an appropriate plumbing professional to investigate, correct any confirmed problem, and perform relevant follow-up checks. The bathroom's completion status should reflect the significance of unresolved issues.
Verifying completed corrections
Once corrective work is finished, the item should be reviewed to establish that the original concern has been addressed and no new problem introduced. Replacing a floor component may affect nearby finishes; repairing a service connection may require repeat specialist testing. Records of significant corrections can support clarity at handover.
Understanding when the project is formally complete
The contractual and legal meaning of completion varies. Some arrangements provide for practical completion, a defect-liability period, or resolution of limited minor items after a defined milestone. Homeowners should not assume that any minor issue automatically blocks all completion procedures, or that a contractor can declare completion despite significant unresolved problems. The applicable contract, law, and defects determine the proper approach. Professional legal or building advice may be appropriate if agreement cannot be reached.
Final renovation handover checklist
Before confirming handover, homeowners can review the following:
- ☐ Agreed scope: Completed work has been compared with the contract, relevant specifications, and agreed changes.
- ☐ Walkthrough: Renovated areas have been inspected, with omissions and defects recorded.
- ☐ Significant issues: Safety, essential-function, or compliance concerns have received appropriate professional attention.
- ☐ Corrections: Required repairs have been completed or remaining responsibilities documented.
- ☐ Technical verification: Applicable tests, commissioning activities, and repeat checks are complete.
- ☐ Regulatory status: Required final inspections, certificates, or approvals have been obtained or their outstanding status explicitly addressed.
- ☐ Project records: Drawings, inspection reports, installation records, and agreed changes are available.
- ☐ Equipment information: Relevant manuals, maintenance instructions, and warranties have been provided.
- ☐ Access: Necessary keys, access devices, and control information have been transferred.
- ☐ Completion confirmation: The parties understand the recorded handover status and any continuing contractual obligations.
This is a practical review tool, not a substitute for required formal approvals or the applicable contractual procedure.
Completing the handover
When relevant conditions are satisfied, the homeowner and contractor can confirm the agreed handover status. Any open items and the procedure for dealing with them should be documented. The owner should also know where important controls are located, which finishes require particular care, and which system maintenance tasks need specialists.
Renovation completion is therefore not established solely by the final coat of paint or the departure of contractors. It depends on the agreed work being appropriately verified, outstanding issues being resolved or managed under the applicable process, and essential information being transferred for continued use.
CONCLUSION
A successful renovation workflow is built around the conditions that allow each task to proceed safely and correctly. The most important decisions involve identifying dependencies between trades, completing necessary checks before work becomes concealed, and ensuring that materials and building systems are ready for the next operation. Following these principles helps homeowners recognize potential conflicts before they lead to damaged finishes, repeated work, or unresolved technical problems.
The correct renovation sequence must also reflect the property itself. Structural conditions, shared services, installation requirements, and unexpected discoveries can change the order of activities. Some tasks can proceed simultaneously, while others depend on professional assessments, completed testing, or regulatory approvals. When circumstances change, the practical response is to review the affected work and its dependencies rather than continue with a schedule that no longer reflects actual conditions.
Homeowners can use this understanding to ask contractors more specific questions: What must be finished first? Which checks are still outstanding? Is the next installation technically ready to begin? Before accepting the completed renovation, they should also review outstanding defects, confirm that necessary approvals and documentation are available, and understand the requirements of installed systems.
Ultimately, the home renovation order of work should serve as a practical decision-making framework, not an inflexible checklist. What matters is that each stage establishes the right conditions for the work that follows, through to final handover.
FAQ
Can Renovation Work Continue in Another Room While an Inspection Is Pending?
Yes, work in another room may continue if it is genuinely independent of the installation awaiting inspection and can proceed safely. For example, painting in a separate area may be possible while concealed plumbing in a bathroom awaits approval. However, work requiring inspection must remain accessible until the applicable requirements are satisfied. Contractors should also confirm that no site-wide restriction, shared-service dependency, or safety concern prevents other activities from continuing.
What Should Happen If Hidden Damage Changes the Approved Renovation Plan?
Work affecting the damaged area should pause until the condition has been assessed and an appropriate solution established. Structural damage, water intrusion, or deteriorated building materials may require investigation by qualified specialists. If the proposed correction changes approved construction details, the project team must determine whether revised drawings, permits, or other authorizations are necessary. The affected contractors should receive updated information before dependent work resumes. Unrelated activities may continue where safe and permitted.
Does Every Home Renovation Require a Formal Final Inspection?
No. Formal final inspection requirements depend on the renovation scope, local building regulations, and any permits or approvals issued for the project. Cosmetic improvements may not require a building authority's final inspection, while structural alterations or certain regulated installations may involve mandatory inspections or certification. Even when no formal final inspection is required, homeowners should review the completed work, confirm that applicable specialist testing has been performed, and collect relevant documentation before accepting the renovation.